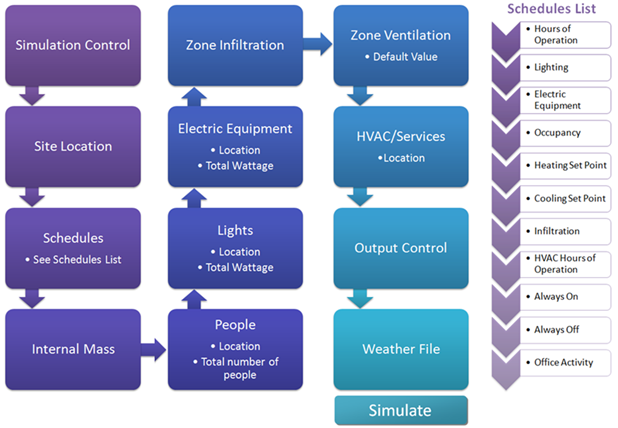
OpenStudio process flowchart (through Google SketchUp)
SketchUp/OpenStudio step-by-step instructions
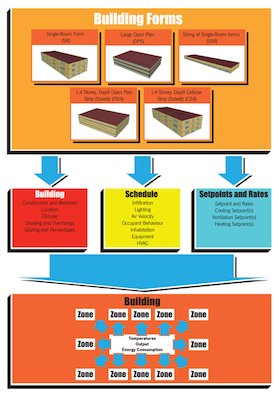
1. SketchUp/OpenStudio, open the relevant built form file and save as the associated building ID number to the correct folder.
2. Adjust building according to the square root of the floor plate to create a square box.
- Use the ruler to draw a line to the desired length (square root) of the wall.
- Select the entire building.
- Scale (Ctrl+T, then Ctrl+S) the building to meet the measured points.
3. Rename walls, windows, roof, ceilings and floors appropriately.
- Double click the zone.
- Right click surface > OpenStudio > Object Info.
- Name: [Insert new name].
4. Adjust building height and number of storeys. To adjust building height, follow the process above as for adjusting length and width. If multiple storeys are being added, insert windows on ground storey before duplicating it. This will save a lot of time.
5. Change the outside boundary conditions for all surfaces.
- Double click the zone.
- Right click surface > OpenStudio > Object Info:
- If Outside: Tick Sun Exposed & Wind Exposed.
- If Surface: Assign Outside Boundary Surface. - OR
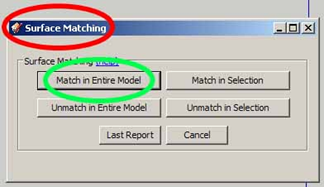
- If Surface: Plugins > OpenStudio > Surface Matching.
- Match in Entire Model.
6. Insert/adjust glazing percentages (as one large window). To insert a window:
- Double click the surface/zone you would like to insert a window into.
- Using the rectangle tool, draw window to desired size inside the surface.
- To scale window, select the window then Ctrl+T, then Ctrl+S.
7. Insert any overhangs. To insert an overhang:
- Select New EnergyPlus Shading Group.
- Using the rectangle tool, draw overhang to desired size inside the surface.
- To scale window, select the window then Ctrl+T, then Ctrl+S.
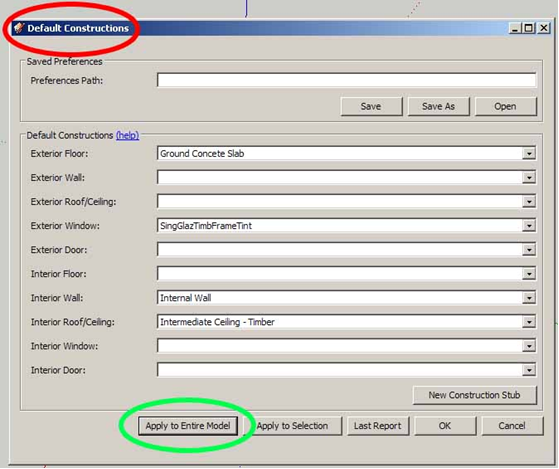
8. Change materials on all surfaces:
- Double click the zone.
- Right click surface > OpenStudio > Object Info.
- Change the construction.
OR
- Plugins > OpenStudio > Default Constructions.
- Choose constructions.
- Apply to Entire Model.

9. Draw walls to represent near buildings for overshadow ratios:
- Draw as New EnergyPlus Shading Group.
- Size to appropriate overshadowing.
- Change from building shading to site shading.
If building has a directly adjacent building, a shading group does not need to be created.
For an adjacent building of the same height and width:
- Create an adjacent zone.
- Make adjacent walls surfaces with an ‘internal wall' construction.
For an adjacent building of a smaller height and/or width with no adjacent building on the opposite side:
- Create an adjacent zone of the appropriate size.
- Split existing wall into two surfaces - size of adjacent building (1) and left over area (2).
- Right click surface > OpenStudio > Object Info.
- Make adjacent walls surfaces with an ‘internal wall' construction.
- Make left-over area outside walls (tick Sun + Wind exposed).
IDF editor
10. Simulation Control:
- > Yes
- > Yes
- > Yes
- > No
- > Yes
11. Building: Check Building Information is correct - Building ID # and terrain. Orientate building. If facades are north-west, north-east, south-west and south-east, rotate to 45°.
12. Site: Location: Update location to match global position and site details.
13. Schedule: Compact: Change and add in any schedules:
- Services Hours of Operation
- Lighting
- Electric Equipment
- Occupancy
- Heating Set Point
- Cooling Set Point
- Infiltration Schedule
- Hours of Operation
- Always On
- Always Off
- Office Activity Schedule
- Schedule Type Limits Name
- > Through: 12/31
- > For: (Weekdays, All Days etc)
- > Until: (Time)
- > Value
- > Until: (Time)
- > Value
14. Internal Mass: (when calculation is organised)
15. People: (Don't forget to change Design Level Calculation Method to appropriate method.)
- Name
- Zone Name
- Occupancy Schedule
- Calculation Method
- People
- Fraction Radiant > 0.3
- Sensible Heat Fraction > autocalculate
- Activity Schedule
- ASHRAE > No
- Mean Radiant Temperature Calculation Type > ZoneAveraged
16. Lights: (Don't forget to change Design Level Calculation Method to appropriate method.)
- Name
- Zone Name
- Lighting Schedule
- Calculation Method
- Watts
- Return Air Fraction > 0.4
- Fraction Radiant > 0.4
- Fraction Visible > 0.2
- Fraction Replaceable > 1
- End-Use Subcategory > General
- Return Air Fraction Calculated > No
17. Electric Equipment: (Don't forget to change Design Level Calculation Method to appropriate method.)
- Name
- Zone Name
- Electric Equipment Schedule
- Calculation Method
- Watts
- Fraction Latent > 0
- Fraction Radiant > 0.5
- Fraction Lost > 0
- End-Use Subcategory > General
18. Zone Infiltration: (once CO₂ calculations have been organised). (Don't forget to change Design Level Calculation Method to appropriate method.)
19. Shading Site and Building (Site is surrounding buildings; Building is overhangs, louvres etc.).
20. Zone Ventilation (when calculated).
21. HVAC Template: Thermostat
- Name > All Zones
- Heating Schedule
- Cooling Schedule
22. HVAC Template: Zone: Ideal Loads Air System:
- Zone Name - select the zones that are conditioned
- Template Thermostat Name - All zones, which relates to the thermostat name in step 21.
23. Output Control: Table: Style
- Comma
24. Output: Variable
- Add in which output variables you want e.g. Ideal Loads Air Sensible Cooling Energy.

Input datafile (IDF) editor process (through EnergyPlus)