


The relevant Building Code performance requirement (E2.3.2) is clear about cables penetrating an exterior wall: ‘Roofs and exterior walls must prevent the penetration of water that could cause undue dampness, damage to building elements, or both.’
The flexibility of cables passing through walls presents a problem – in strong wind, they can move around. This movement can gradually lead to sealant around the cables being damaged, creating a risk of leaks. However, there are steps you can take to better ensure weathertight construction.
For proprietary cladding/render systems, check the manufacturer’s requirements. Some only allow wiring penetrations through a PVC conduit. Where a cladding has a polystyrene backing, PVC-sheathed cables must not come into contact with the polystyrene.
For exterior walls with a fire resistance rating (FRR) – for example, a wall less than 1 m from a boundary – the penetration seal must also maintain the FRR of the wall.
Detail them
Cable penetrations should be shown on wiring drawings in building consent applications, but the location should be worked out in advance of construction even where consent is not required. This decision should not be left to staff on site. (It is their job to get details right. For example, with cladding such as weatherboards, shiplap and so on, the penetration should go through the main part of the cladding and not joins or laps.)
The best result comes from coordination between the building contractor and electrician. Any electrical connections must be made by a licensed electrician who should test the system and supply a certificate of compliance and electrical safety certificate.
Minimise penetrations
Reduce penetrations to maintain thermal performance and reduce the risk of leaks. Can multiple cables be brought together, perhaps through a conduit?
Be aware that telecommunications cables should not run alongside mains power cables. AS/NZS 3000:2018 Electrical installations – Known as the Australian/New Zealand Wiring Rules gives separation requirements around power cables from telecommunications, extra low voltage and other services.
Install cables in a conduit
Installing cables in a solid conduit (typically PVC pipe) protects them against damage. The conduit is sealed in the same way as other rigid penetrations. Steps for new construction:
- Install the wall underlay. This may be flexible or rigid, but rigid underlays provide a solid substrate for more effective taping around penetrations.
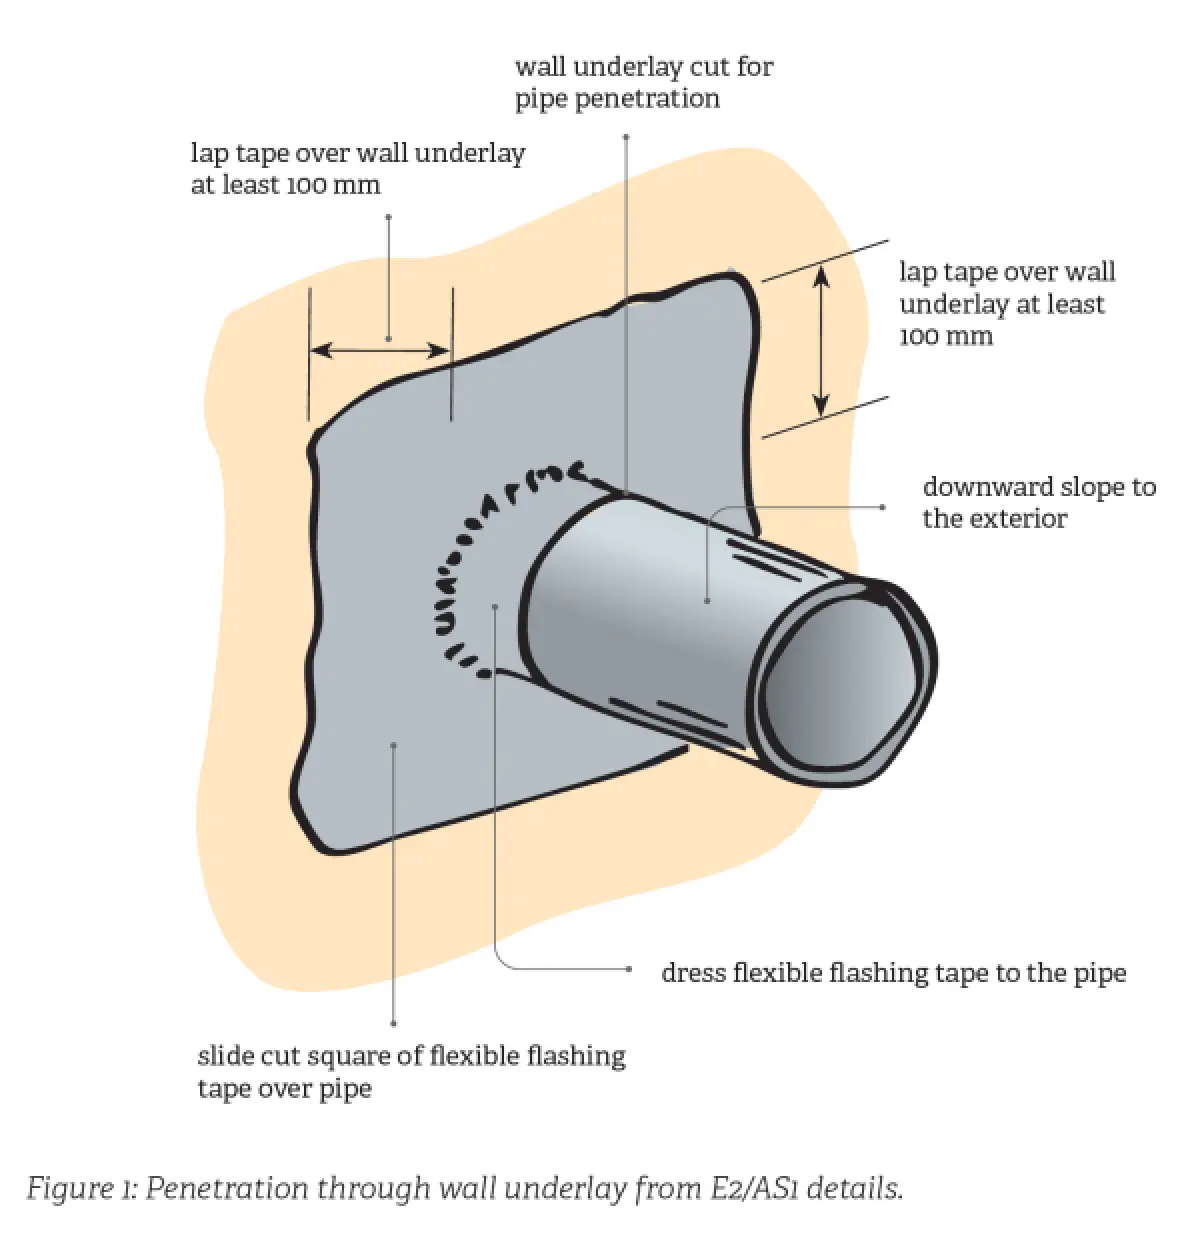
- Construct the penetration. Avoid cutting oversized holes – filling a large gap around a pipe with sealant is not a good idea. The pipe should run slightly downhill from interior to exterior so water that gets in can drain out (see Acceptable Solution E2/AS1 4th edition 9.1.8.3 and Figure 9.1.8.3A). Seal the pipe against the underlay with flexible flashing tape for at least 100 mm and to the pipe for at least 25 mm (Figure 1). Proprietary seals (which some manufacturers call grommets) in different sizes are also available. Use a rigid sleeve if conduit will be installed later.
- Install cladding. Fix the pipe or sleeve so it does not move with sealant around it.
Where cables are not in a conduit
There may be cases where a conduit is not possible or wanted and cables alone will penetrate the wall. E2/AS1 has no drawing for this. The best sealing option is likely to be a proprietary cable penetration seal, typically a flexible EPDM membrane that is bonded to the underlay. Some hold BRANZ Appraisals. Select the product to match the cable diameter. Paintable sealing compounds are also available but may need several coats for a durable seal, and drying times must be considered.
Penetrations for light fittings, switches and power sockets
Where light fittings, switches and power sockets are installed directly on an outside wall, the fitting should be specifically recommended for outdoor use by the manufacturer. The cable is typically drawn into the back through a watertight entry point, but some manufacturers also require sealant to be applied here on the inside back of the fitting.
Where the cladding is not vertical – such as bevel-back weatherboards – the builder may cut a timber fillet to give a vertical surface for the fixture.
Cable penetrations through existing walls
Occasionally, a penetration may need to be made through an existing wall, for example, new cabling for TV, phone or data. The best approach is removing enough cladding to access and fully seal the wall underlay around the penetration, but this may be impossible and a flange plate may be installed to the cladding instead (Figure 2).
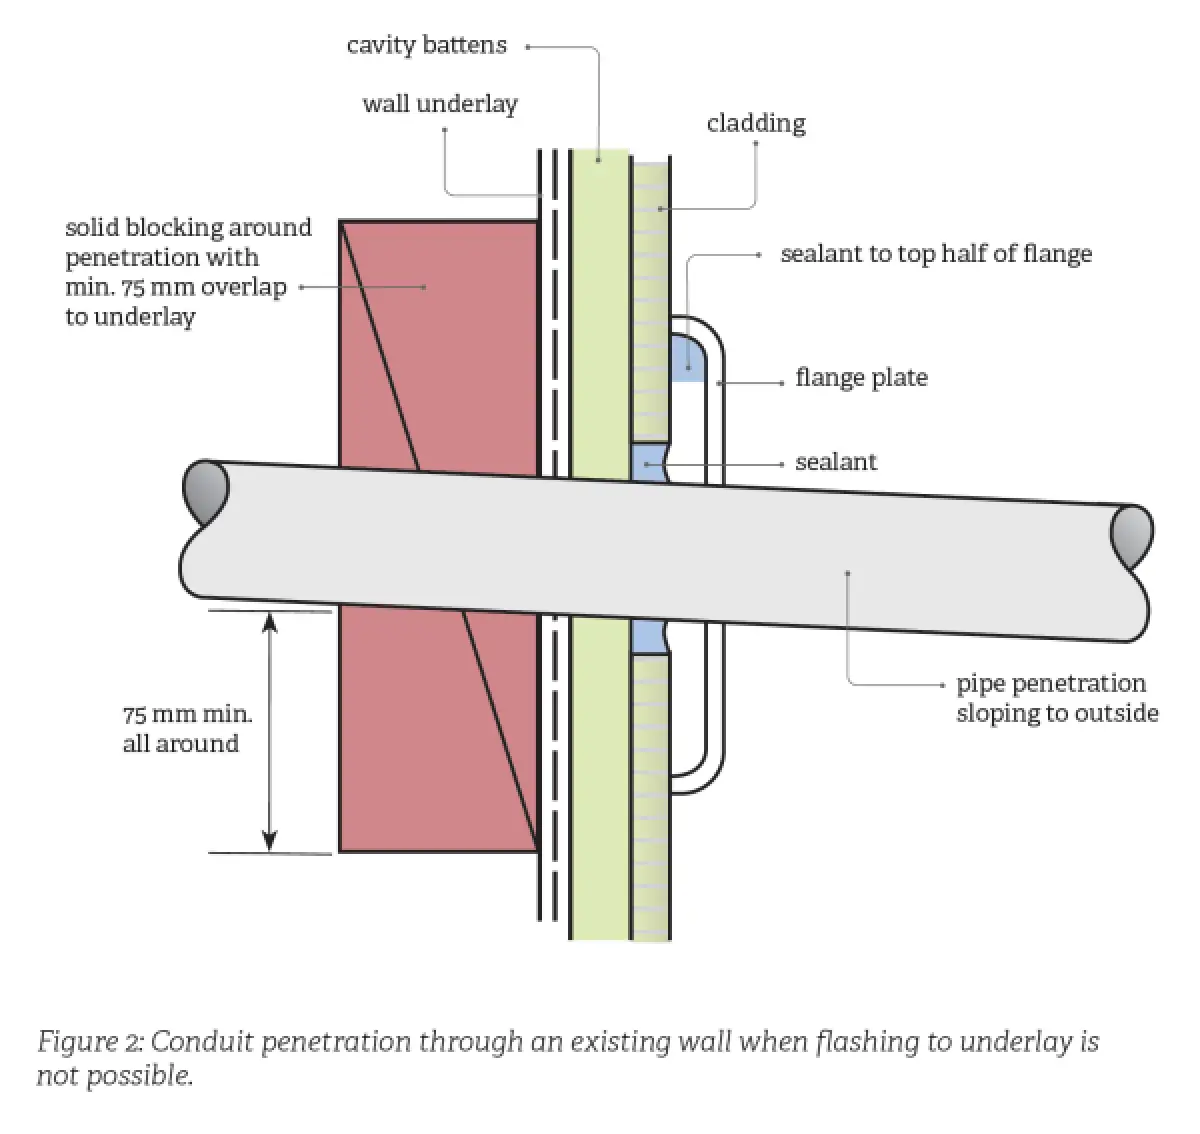
The robust result in Figure 2 (based on a figure in E2/AS1) is likely to require removal of lining.
Some seal manufacturers state their seals can be installed to the inside of underlays for retrofits.
Penetrations should ideally be located in a sheltered position such as under eaves, a veranda or porch or on the sheltered side of the building.
- For guidance around penetrations for heat pump hoses and pipes, see the Good practice guide to heat pump installation
- For guidance about installing EV chargers, see Electric vehicle chargers for residential use