


Universal design is about designing buildings and environments so they are equally accessible to all people, whether or not they are ageing or have disabilities or not.
This means designing new homes so they can easily accommodate changing needs. People can then live independently in their own home regardless of their physical ability as they age.
NZ lags in universal design
Unfortunately, most New Zealand homes do not incorporate universal design principles or have good accessibility for people with physical disabilities.
In places such as hilly parts of Wellington where external steps provide access to the house, simply getting to and from the home can be difficult. Indoors, narrow hallways, stairs, narrow door openings and small rooms and spaces can make moving around the home difficult.
Wet areas the most problematic
Poor accessibility to and in the kitchen, bathroom and laundry – the wet areas – is often the biggest obstacle to people continuing to live easily and independently in their own home.
A small bathroom may mean that a wheelchair user cannot access it. Baths may be an obstacle, and showers are often installed over a bath.
Wash hand basins and vanity units that are too high and unable to be approached closely by wheelchair users are a problem. Some tap designs can be difficult for people with limited grip and agility.
When a person cannot easily use bathroom facilities, the home is effectively non-functional for that person.
Size important in a bathroom
Generally, the larger the bathroom, the easier it is to move around fittings and fixtures for someone who is older or has a disability. A turning diameter of at least 1500 mm is required for wheelchair use.
A bathroom should be accessible from all areas of the house. If the house has more than one level, each level should have a toilet.
When designing a new building, if possible, locate a bathroom close to or directly accessible from the bedroom used by a person with a disability. The bathroom door, and indeed all doors in a home, should be at least 810 mm wide for wheelchair access. A second bathroom on the same level need not use accessible design.
In new construction, bathroom walls, particularly around the toilet and shower, should be reinforced so that grab rails may be installed anywhere on the walls for future use (see Figure 1).
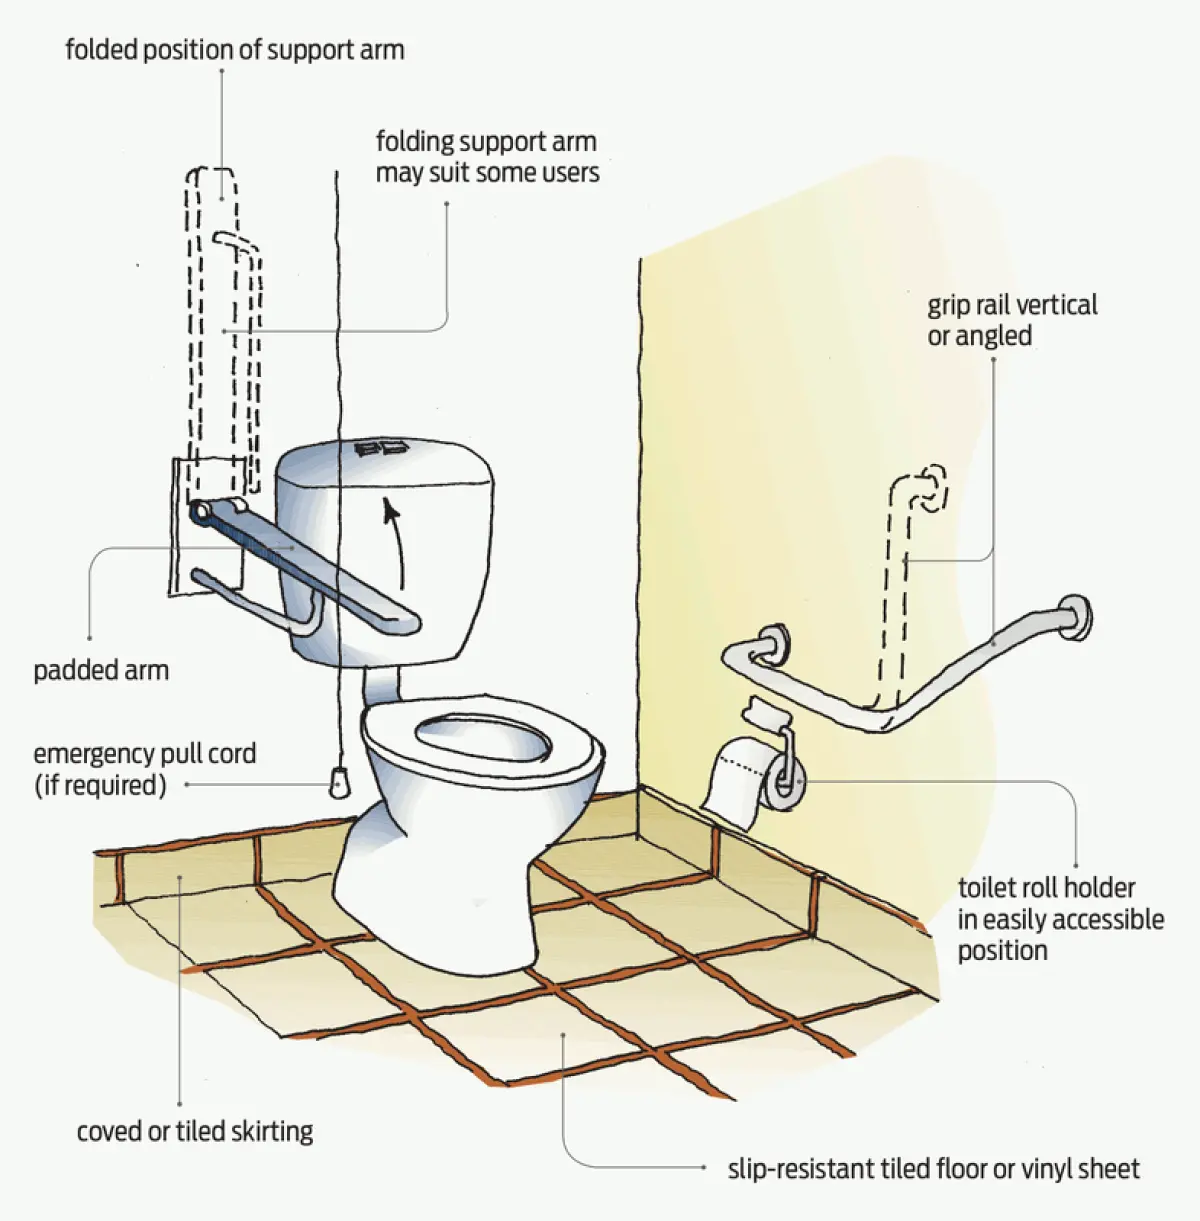
Need space around toilets and bidets
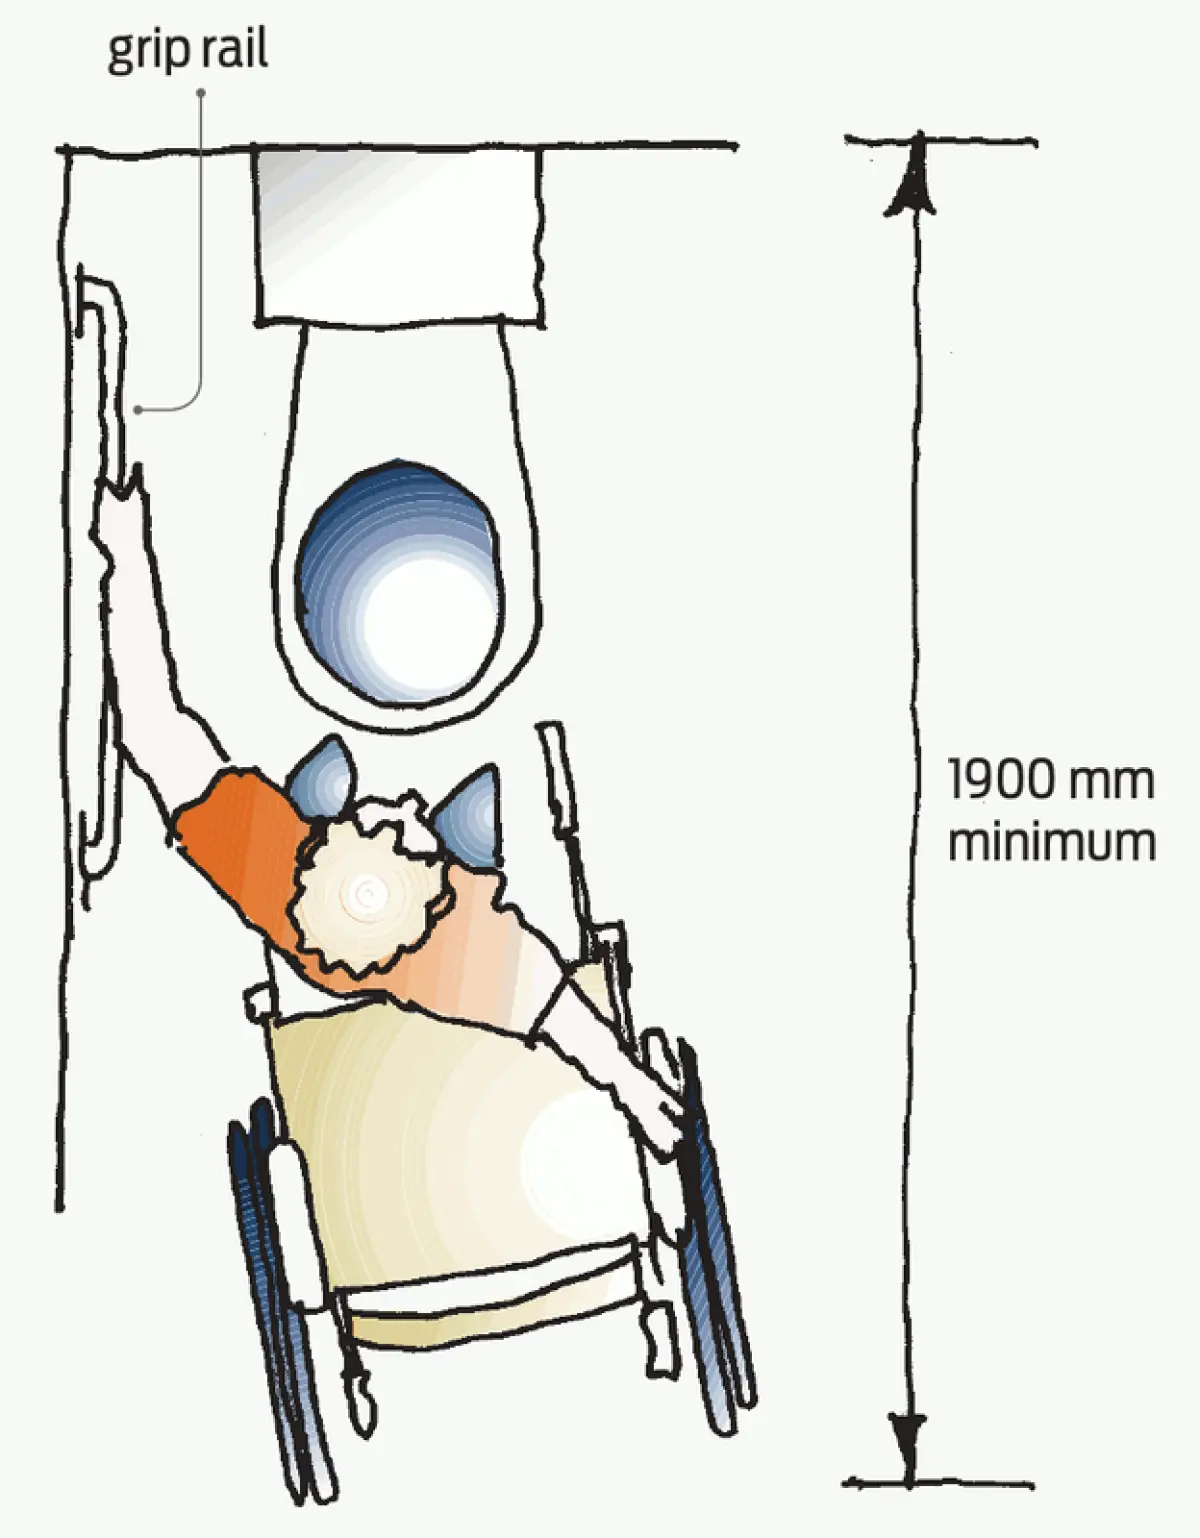
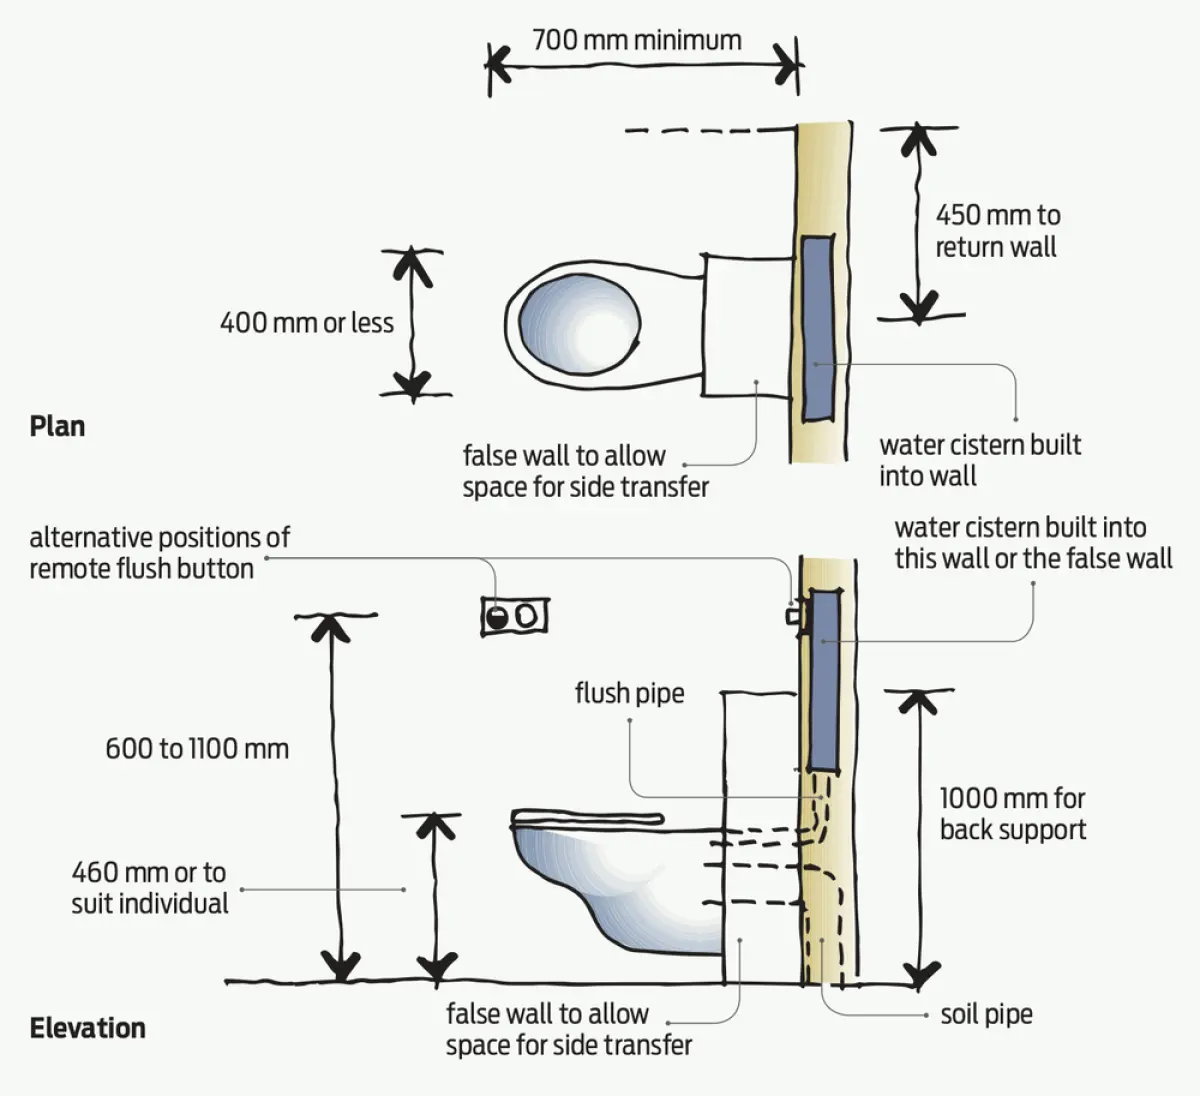
Wheelchair users need more space than is often available beside or in front of the toilet so they can transfer between the wheelchair and the toilet.
The most common ways to transfer are from the side (see Figure 2) and from the front (see Figure 3). Grip rails must be provided and a moveable support arm may be useful to provide additional support if required.

The transition from wheelchair to toilet seat is easier when both seats are at the same height, typically between 460–480 mm (see Figure 4). If a bidet is installed, it should be beside the toilet pan and able to be accessed in the same way as the toilet.
A standard toilet space may be too small for some disabled people, but usability may be improved if grip rails are installed.
Rehanging a door to open outwards can also improve access into the room for people who are ambulant.
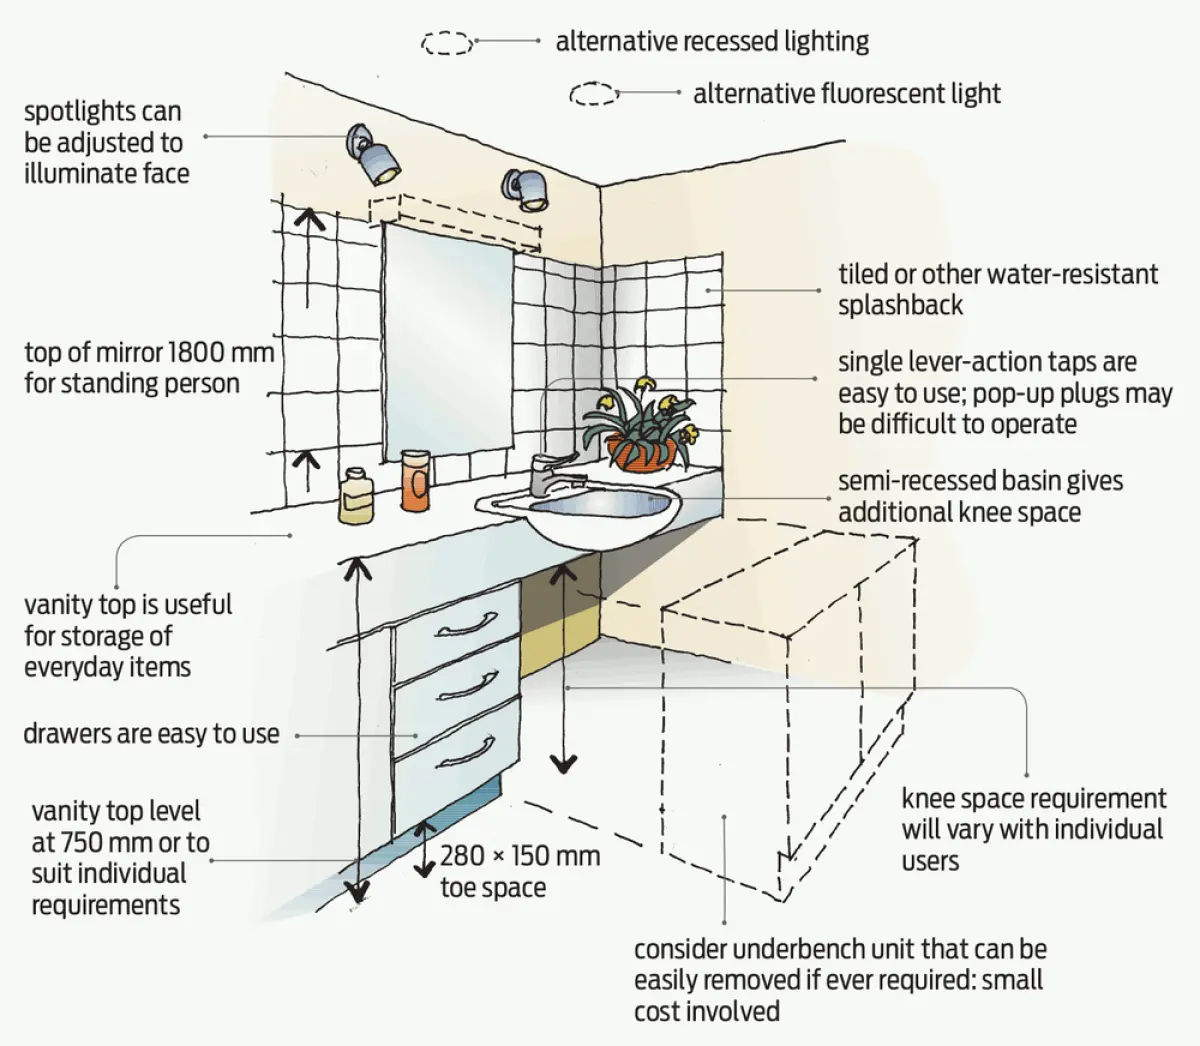
Lower the height of basins
Wash hand basins need to be at a lower level for wheelchair users. Clear space is also required below the basin or vanity to move a wheelchair underneath it (see Figure 5).
A vanity unit that is height adjustable and designed with a removable storage cupboard below the basin is ideal. It can be easily adapted for use by a person in a wheelchair by relocating the storage cupboard and lowering the vanity top.
Another option when installing two basins in a new or retrofitted bathroom is to place them at different heights. A low basin is also more easily accessible for children.
Anyone standing or seated can use a semi-recessed basin projecting beyond the front edge of the vanity as long as the height is appropriate for the seated user.
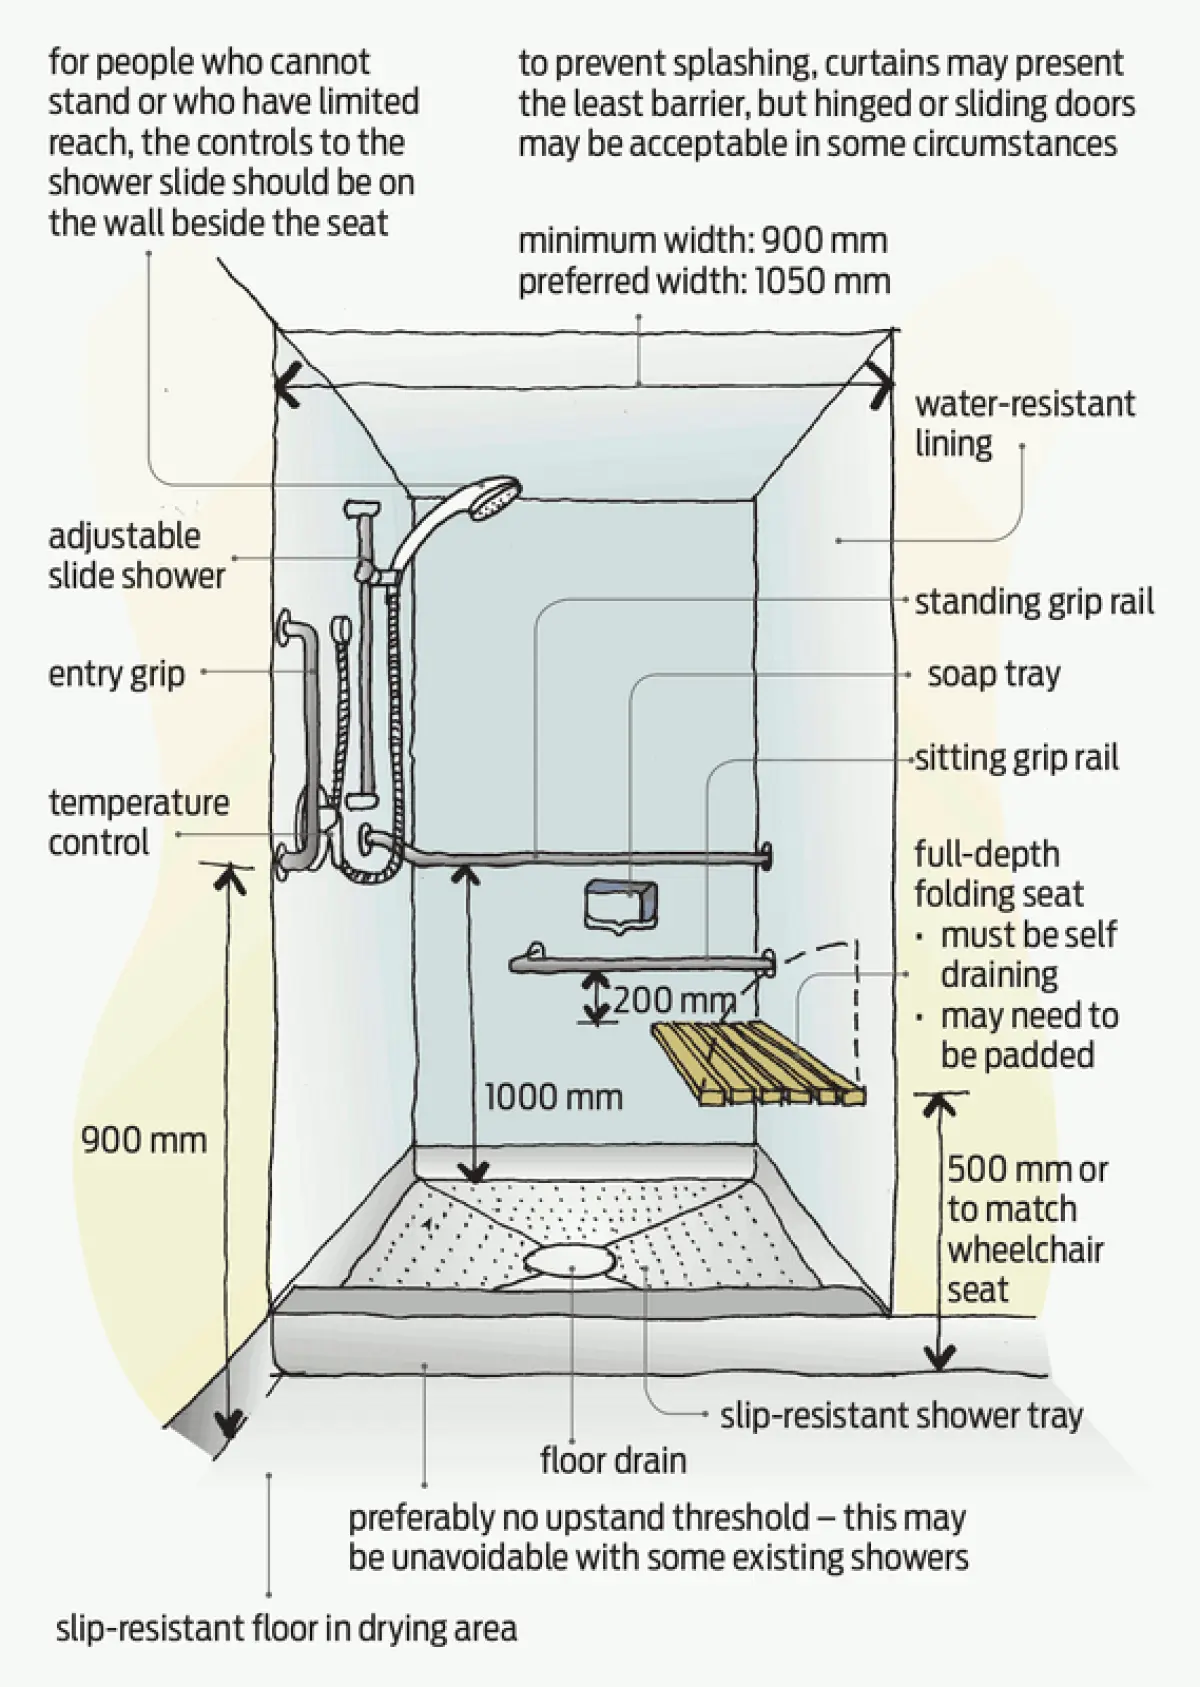
Wet area shower better
Showers are generally easier for people with a disability to use than a bath. However, the upstand typically found around shower bases to contain water can be an obstacle to wheelchair users or a trip hazard.
Adapting a shower
Standard shower cubicles are often too small for easy use by people with disabilities, particularly when assistance is required.
A shower space should be at least 1000 × 1000 mm for easy use by anyone.
To adapt an existing shower, it should have grip rails, a lever mixer handle preferably located next to the shower entrance, an adjustable height, flexible showerhead hose on a sliding rail, a slip-resistant base and, ideally, a seat.
The shower seat should be installed on the wall adjacent to and within easy reach of the mixer and the stream of water. It should be self-draining and comfortable to use.
Wet area shower
A wet area shower overcomes the obstacles of size and an upstand as these are constructed continuous with the bathroom floor.
The floor in the shower area should slope to an outlet or a channel so water can drain away.
A channel drain means the floor can be constructed with a single slope to the channel, which then drains to an outlet. The single slope is easier for a person with a disability to negotiate compared to a multiple slope floor to a single outlet. Larger tiles may also be used more easily without requiring excess cutting or fitting.
The entire floor of a wet area bathroom needs to be constructed to good waterproofing practices.
A universal design shower should have a permanently installed or fold-down shower seat, grip rails, a lever mixer tap and an adjustable-height flexible hose spray on a sliding rail (see Figures 6 and 7).

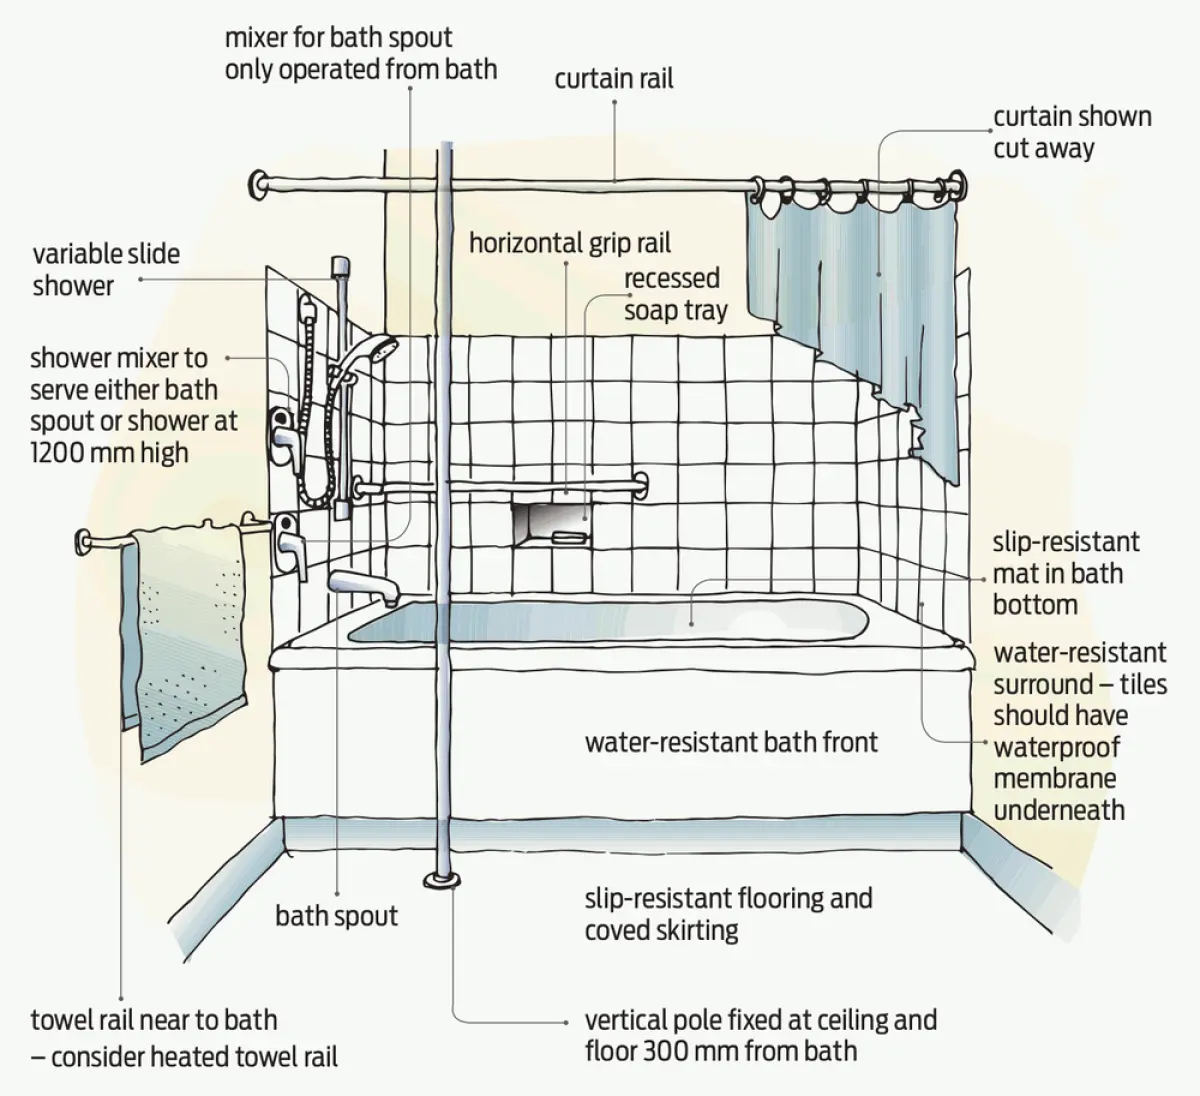
Baths need non-slip matting
Baths can be hazardous for older people and people with disabilities as:
● stepping in and out is a problem
● the base can be very slippery, especially once wet
● the curved base makes it more difficult to stand.
Baths should always have non-slip matting. If a bath is kept or installed, it should be fitted with:
● a lever mixer tap reachable while a person is seated in the bath
● a shower on an adjustable-height slide
● an L-shaped – horizontal and vertical – grip rail that can be held onto while the person is showering.
A vertical grip post installed beside the bath allows a person to support themselves while making a 90° turn when they are stepping in and out of the bath (see Figure 8).
Walk-in baths with a door allowing the bather to step in and out of the bath, rather than needing to step over the edge, are available. These are generally shorter than a standard bath but are also deeper with a non-slip floor and seat.
Lever handles easiest to use
Lever-action mixers make the temperature control of hot water easier.
Taps should be easy to grip and use – generally lever handles are the easiest. Tap handles that are round or knob-shaped can be difficult to grip and operate for people with arthritis or other disabilities affecting their hands.
Taps and mixers should be installed just inside the shower or bath enclosure for easy access to turn on and off.
Fix grip rails securely
Falls are most likely to occur in bathrooms and toilets for people with and without disabilities, so grip rails should be installed.
Grip rails need to be securely fixed to the wall so they can support the full weight of a person. Walls may need additional reinforcing to securely fix grip rails.
A range of proprietary grip rails are available, and other shapes can be manufactured to suit specific requirements. These are typically stainless steel and may be chrome plated, or powder coated. They should have a textured finish to provide good grip.
People who are unsteady on their feet are likely to grab the nearest support such as a towel rail, whether it is meant as a support or not. Towel rails and other fittings should therefore also be securely fixed.
Laundry
A front-loading washing machine and dryer provide easy access for a person using a wheelchair.
If a laundry tub is installed, it should be at the same low level as the wash hand basin and have clear space for wheelchair access underneath.
Shelves, power outlets and light switches should all be at eye level or approximately 1200 mm from the floor and be within easy reach.

For more See www.branz.co.nz/universal_design.
Legislation
Building Act, regulations and Code
The building legislation has no requirement for accessibility for people with disabilities in privately owned dwellings, but including universal design is a good idea.
Although the New Zealand Building Code includes nine clauses that have requirements for buildings that allow people with disabilities to carry out normal activities and functions, these do not cover privately owned dwellings.
Schedule 2 in the Building Act 2004 identifies the buildings that must provide access and facilities for people with disabilities, but again, privately owned dwellings are not included.
NZS 4121:2001 Design for access and mobility: Buildings and associated facilities
NZS 4121:2001 sets out requirements for the design of buildings, facilities within buildings, driveways, car parks, passages and accessways for use by people with disabilities. It provides good guidelines for universal design for private houses but is not compulsory.
For a copy, see www.standards.co.nz.
Lifemark
Lifemark is a New Zealand organisation representing universal design. It offers certification of homes, indicating that a home has design features that meet the needs of all occupants regardless of age and ability.
Lifemark uses NZS 4121:2001 as a starting point for design to meet the principles of universal design. It encourages the construction of homes that are accessible and free of barriers that may restrict the ability of a person to function safely, easily and independently in the home.
For more See www.lifemark.co.nz.