Construction on conservation projects is a bit like eating a box of chocolates after its best-before date − you never know quite what is going to be under the wrapper. The restoration of the windows at Government House in Wellington was no exception. Here, the happy discovery of best-quality heart timbers such as jarrah and rimu was tempered by the realisation that nearly all the inner sashes had been mixed up in the different window frames during earlier work.
Double sash windows over time
The innovation of the double-hung sash timber window, linked via a pulley to a metal counterbalance, was developed in the 1680s. Experimentation continued until around the 1910s, with the development of double-hung windows that could slide up and down and also pivot in hopper style (a hopper window is a bottom-hung casement window opening in, like a drawbridge) or slide up and down as well as open out with side hinges, like a door.
Simple sliding-only double-hung windows were installed in Government House in 1910 (see Figure 1). Refinements in hinges, the production of sheet glass and the popularity of large plate glass windows saw the demise of double-hung sashes after the First World War – shortly after the construction of Government House.
Flashings and air seals needed
During development of the conservation brief for Government House, the client expressed concern about water and cold air entering the building through the windows. Winter heat loss was excessive. Construction documents required the removal of all the windows to facilitate the following detailed improvements:
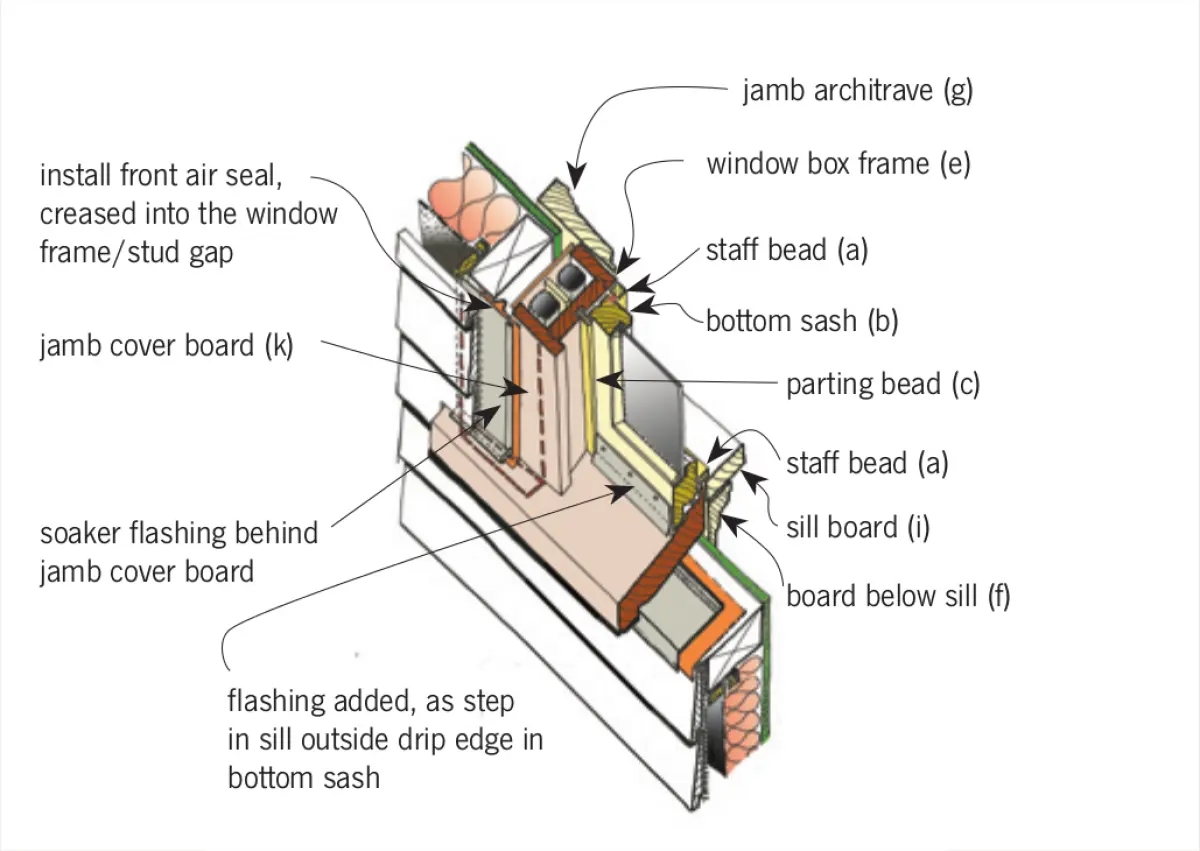
- Air seals added between the window box frame and the cladding. Window tape was dressed into the opening in the standard way, but without cladding removal. The tape butts against the edge of the weatherboards. The final air seal can only be positioned on the front of the window frame, because the sash cord pulley penetrates the sides of the window jambs.
- Sill flashings were important. It was thought the exterior cladding timbers would have more rot than the internal framing in drier conditions, but the reverse was true. The exposed jarrah weatherboards (with a listed inground durability of 15–25 years) showed little signs of rot after 100 years, but the framing was commonly rotten, especially just below the window jambs or mullions on the sill framing (rimu has an inground durability of less than 5 years).
- Mohair brush seals were added, housed into saw cuts in the staff bead. Brushes rubbed on the sash. Rubber gaskets were added onto the base of the sliding sill frame. The top sash frame was sealed shut.
- An exterior flashing was added as steps in the window box frame did not line up with the drip edge of the sliding sash frame. Even with these air seals, the corners of the windows will let some draughts through.
- New heavy-duty glass added.
- Repainting finished the overhaul.
Removal of existing windows
Dave Dawson and LT McGuinness did some excellent work establishing a method to remove the double-sash windows at Government House. Most of this work was completed from the inside, and it was crucial to label all pieces as they are removed (see Figures 2–5).
To remove the double sash window, from the inside:
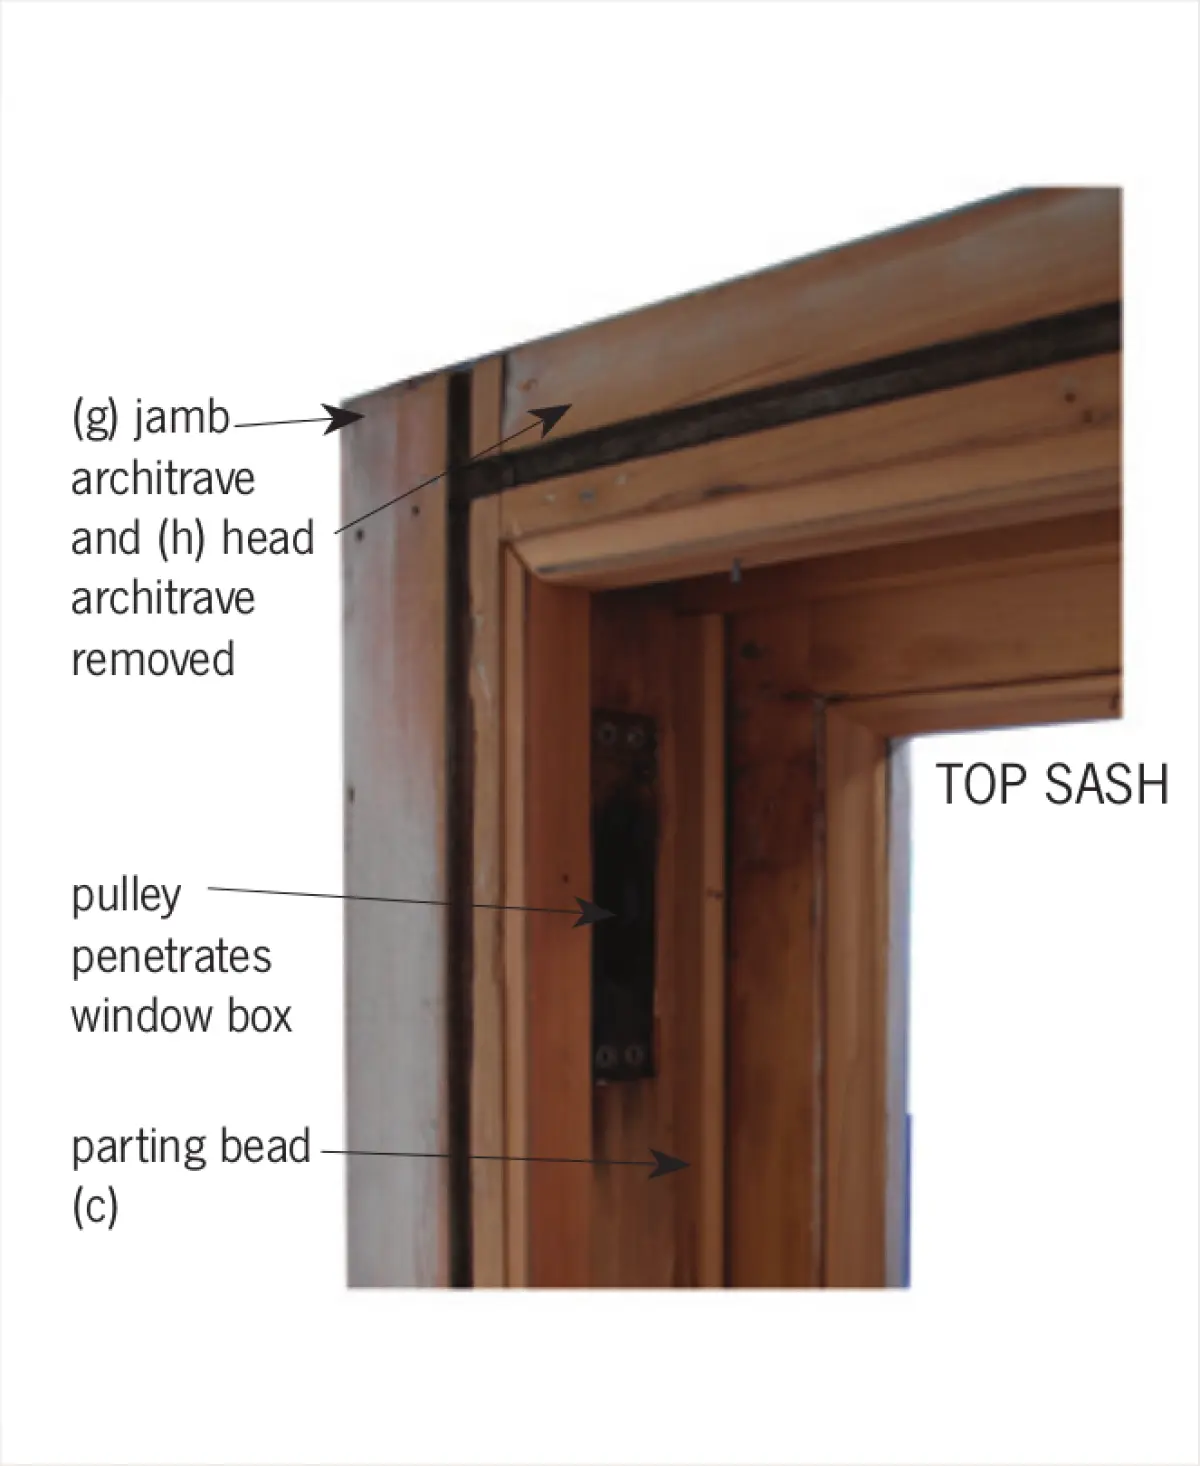
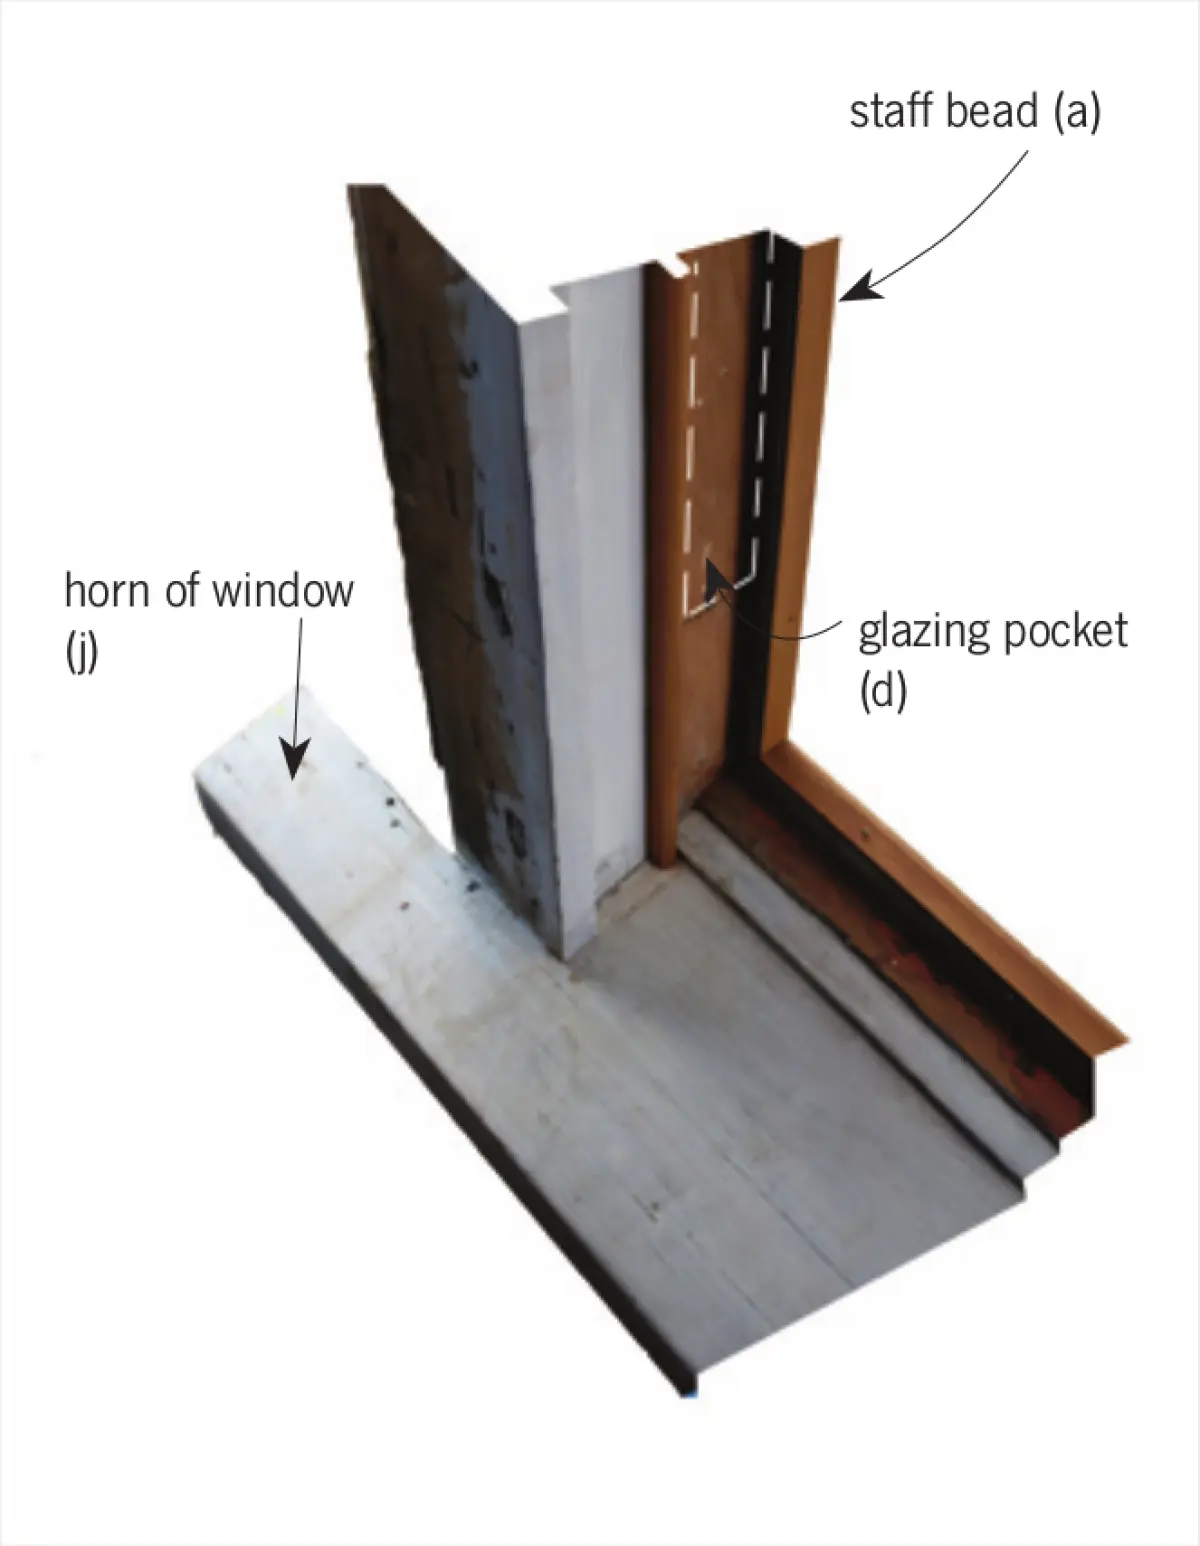
- remove the staff bead (a) by cutting the paint and gently prying out from the centre of the bead and at fixings
- pin or knot the cords or chains at the pulley to stop the counterweights dropping heavily, then remove the entire bottom sash (b)
- use a similar method for the top sash removal – pry the parting bead (c) from the base, slide the window down, then pry out the top of the bead
- remove the cords and weights through the glazing pocket (d).
With the sashes removed, the order for removing the whole window or box frame (e) is:
- remove the board below the sill (f)
- remove the jamb architrave (g)
- remove the head architrave (h) from the box, cutting the nails at each step and being especially careful around the mitres
- remove the sill board (i).
The fixings that hold the window box into the frame, typically only at the head and sill, can now be seen. To finish:
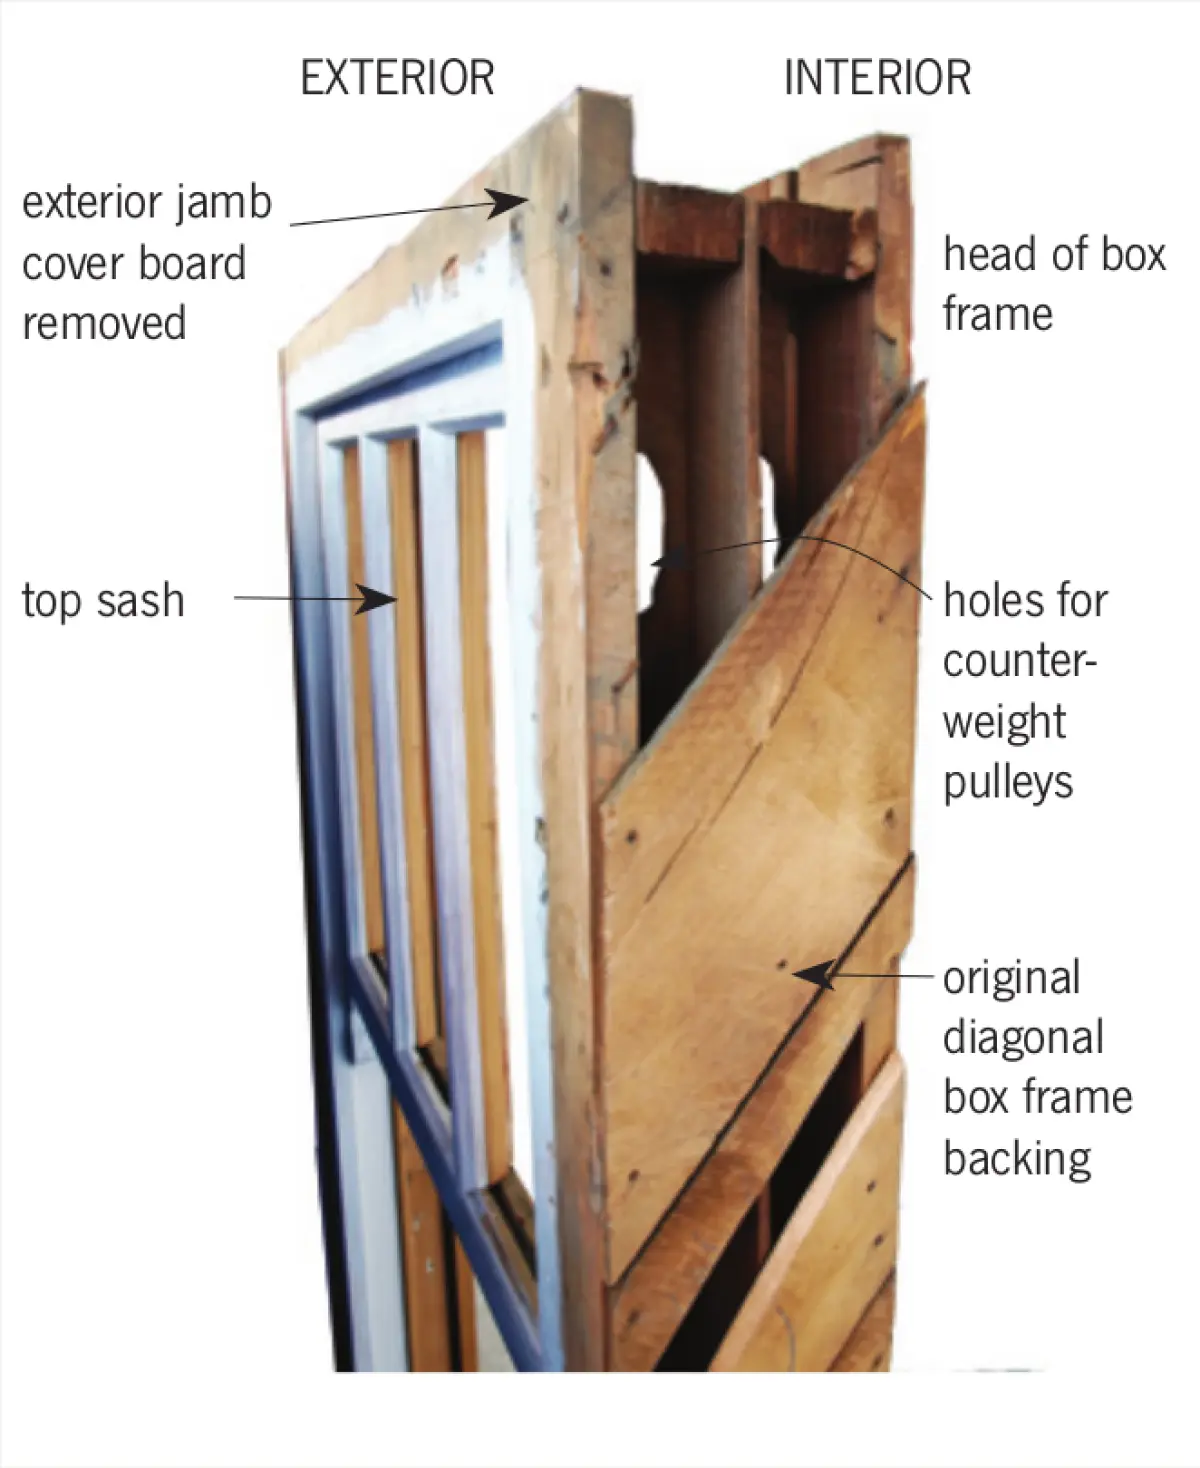
- move to the outside and remove the exterior jamb and head boards
- back inside, cut the fixings, typically at the head and sill, then pry the window out, concentrating on the horns of the window sill first, then drop the window down.
Fixing rot and reconstruction
When small areas of rot were found in the sill framing, this was cut out to 200 mm past the affected area. The cut timber was treated with preservative and H3 treated dovetails glued in. Flitch plates extending 1 m past the patches were type 17 screw fixed on the back for strength.
For large areas of rot, the entire timber was replaced.
For the reconstruction:
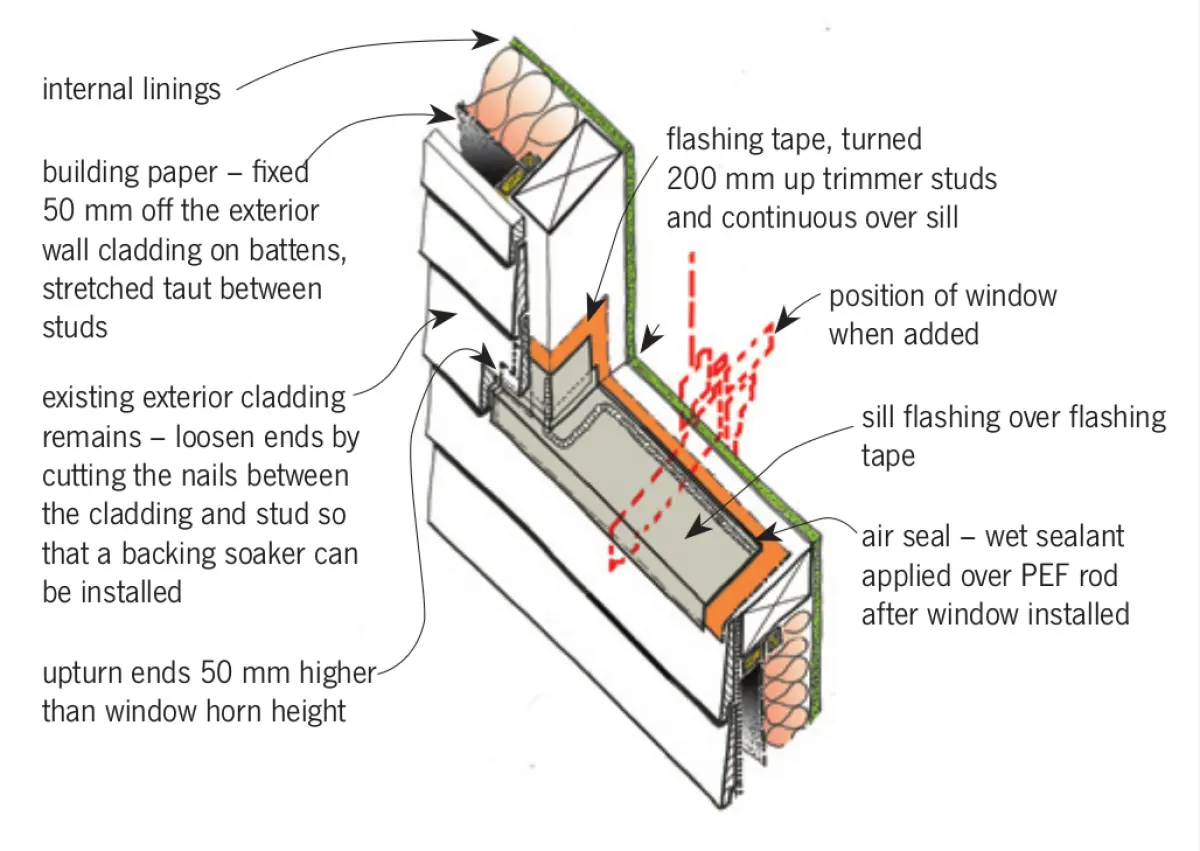
- add flashing tape around the window according to the WANZ WIS system – remember to add the flashing over the sill first and upturn the flashing ends about 100 mm (50 mm higher than the top of the horn (j) of the window)
- add the window box added
- add front air seals, using flashing tape to cover the gap between timber studs and lintel and the window frame – this tape needs to be folded and creased into the gap between the stud and frame as an air buffer
- squeeze a soaker flashing 50 mm between the cladding and extending 50 mm behind the jamb cover board (k)
- install remaining timber trims in the reverse order to how they were removed
- put the head flashing on last, tucked under the cladding above.
Double glazing not part of the solution
Sometimes it is possible to add double glazing to double-hung sash windows. The size of the glazing rebate and how the additional counterweights will work needs to be considered.
For Government House double glazing was not used, as the counterweights already had to deal with heavier security glazing. In rooms used intermittently, extra draught-stopping and proposed curtains with an interlining of insulating material gave best value for money.
Double glazing is only sometimes introduced when reconditioning double-hung sash windows in Scotland.