


Until the early 1970s, when sheet flooring materials became available, flooring in Aotearoa New Zealand houses comprised of timber floorboards. Floorboards in early houses were square edged and butted, but from around the 1860s, this jointing method was replaced by tongue and groove (T&G) boards.
Benefits of timber floors
Timber floors are often installed in new builds for their appearance, durability and sustainability. They are easy to clean, maintain and repair and do not harbour dust and dirt – making them an excellent flooring material for people with allergies. In addition, a significant benefit of solid timber flooring is that it can be repaired.
Repairing damaged timber floors
While timber is a durable material, timber floors are susceptible to minor damage such as scuffs from moving heavy furniture or scratches from pets’ claws or more severe damage from insect attack, rot or subfloor or foundation failure, resulting in bouncy, springy or sagging floors. Surface damage can easily be addressed by sanding, and damaged boards can be replaced.
Fixing boards
Floorboards may be nail fixed or glued and nailed when being repaired. They are nail fixed by:
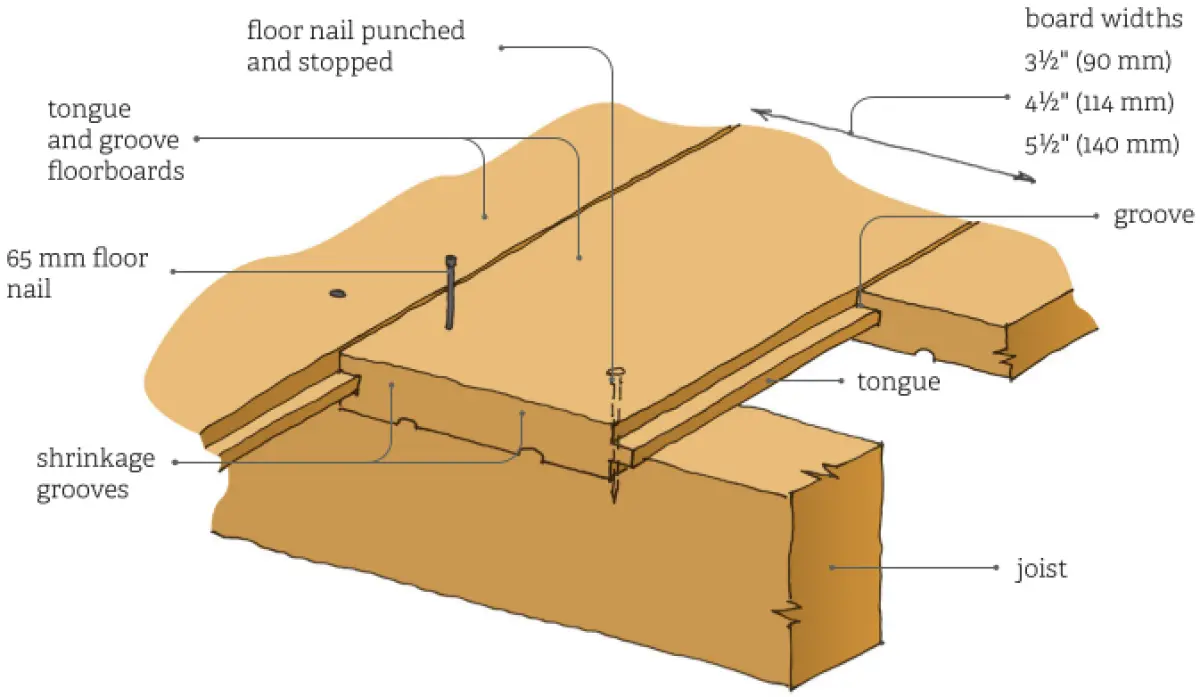
- face nailing where each floorboard is double nailed through the board to each joist
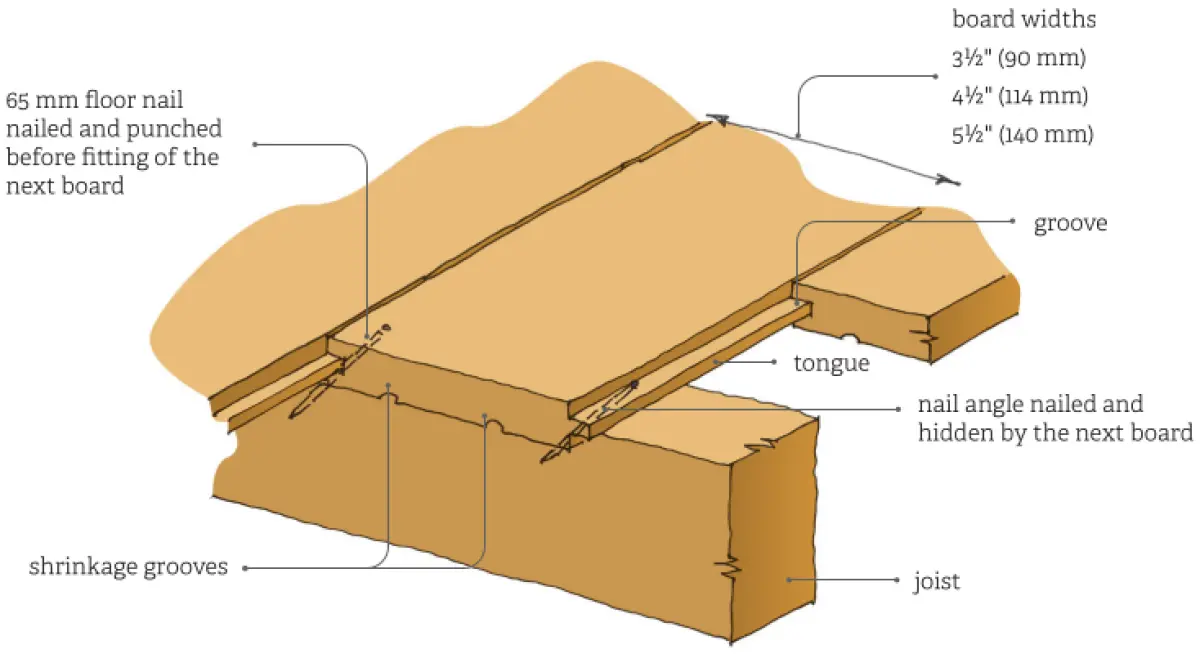
- secret nailed where nails are angled through the tongue and hidden by the next board – see Figures 1 and 2.
The method selected will depend on how the existing floor is nailed.
Floorboards may also be glued as well as nailed. A timber adhesive is applied to the joists (or battens if there is a concrete slab substrate) according to the manufacturer’s instructions, and floorboards must be weighted until the adhesive is fully cured.
End joints
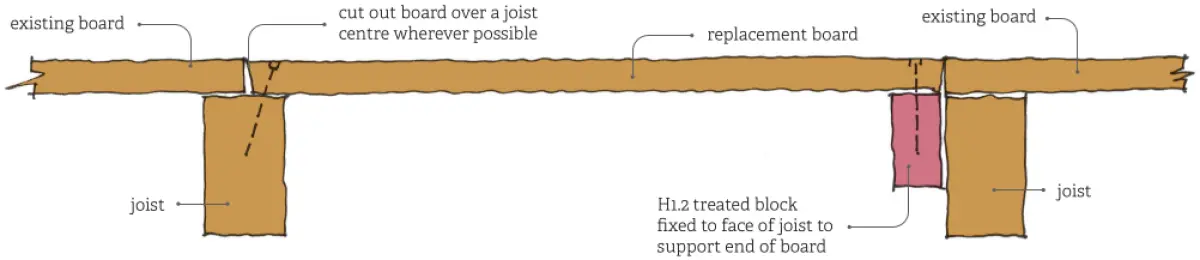
End joints must be made over joists. Where it is not possible to fix over a joist such as at the edge of the floor adjacent to a wall, remove the damaged floorboard up to the joist. Cut and fix a block to the face of the joist ensuring that the block is flush with the top face of the joist to support the end of the board – see Figure 3.
Minor repairs
Minor damage such as scuffs and scratches can be repaired by sanding and applying a new floor finish after first testing the area. Sand the floor in the direction of the timber grain with an appropriate grit of sandpaper, and sand enough to remove the scratches. Apply finish coats to match the existing floor.
If scratches are deeper or damage to the floor is more extensive, the damaged areas may be filled with a timber filler before sanding and applying finish coats.
Repairing split or damaged tongues or grooves
When tongues and grooves have split but the rest of the board is intact, the damaged section can be cut out and replaced with a strip – sometimes called a slip. The repair can be used for small sections of board but is best done to the entire length of the board. It can also be used where there are large gaps between boards due to shrinkage.
- Cut out the damaged section of board. Set the jigsaw or oscillating saw depth to the thickness of the timber floorboard. Cut in the gap between the damaged board and the adjacent board to remove the damaged tongue and groove. Make a parallel cut to the first cut to enable the removal of the damaged section of board.
- Cut a strip of timber to fit and insert into the gap ensuring it spans across the joists below. The strip should be the same timber as the existing boards and be fully seasoned.
Replacing a floorboard
If damage is severe, individual floorboards may need to be removed and replaced. As tongue and groove boards are locked in place, removal of a board requires cutting out the central section of the damaged board first.
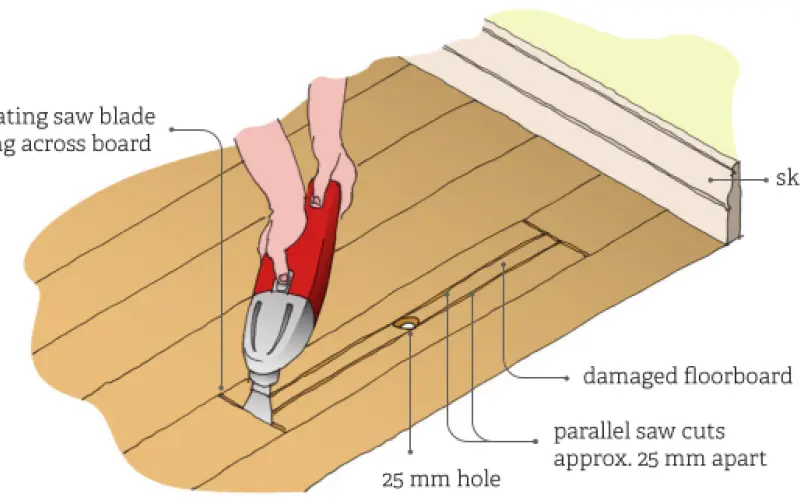
- Set a jigsaw or oscillating saw to cut only as deep as the thickness of the board. Cut in a perpendicular direction across the board at each end of the section of the floorboard to be replaced – see Figure 4. Make two parallel saw cuts lengthwise between the cross cuts, approximately 25 mm apart and through the middle of the floorboard to be removed.
- Alternatively, drill two holes approximately 25 mm in diameter at each end of the damaged section of board. Using a jigsaw or oscillating saw, make two parallel saw cuts through the boards to connect the two holes.
- Pry out the cut section of the floorboard, then the rest of the floorboard between the cross cuts. Avoid prying against undamaged floorboards. Remove any visible nails and all splintered timber, debris etc. from the opened floor area.
- Before fitting replacement floorboards, they should be stored in the room for several days to allow the moisture content to equalise with the existing flooring. If the replacement floorboards are not at the same moisture content as the existing, they will either shrink, causing gaps to open up between boards, or swell, potentially causing boards to buckle.
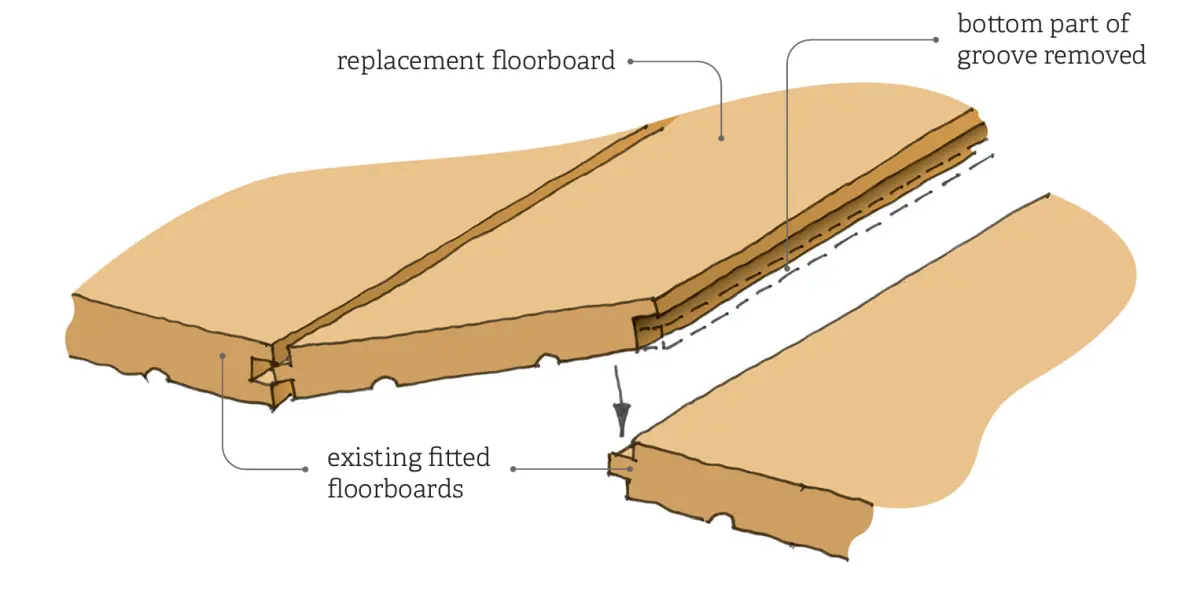
- Cut the replacement floorboard to the correct length so it fits snugly into the space of the old board. Before fitting into place, cut off the bottom groove of the replacement board – see Figure 5. Insert the replacement board into the gap. Gently tap flush with the existing boards using a rubber mallet or hammer and driving block to protect the floor. Nail the board in place with two nails at each end.
- If the replacement board abuts the skirting board, it should be undercut – fitted underneath the skirting rather than scribed to it. If possible, slide the replacement floorboard under the skirting. Alternatively, remove the skirting board before laying replacement boards. When cutting over a floor joist, take care to avoid nails from the original fixing. If it is too difficult to remove the section of the floorboard over the joist without damaging tools, cut the floorboard at the edge of the joist. Nail a block to the side of the joist to provide a nailing surface for the new floorboard to be installed – see Figure 3.
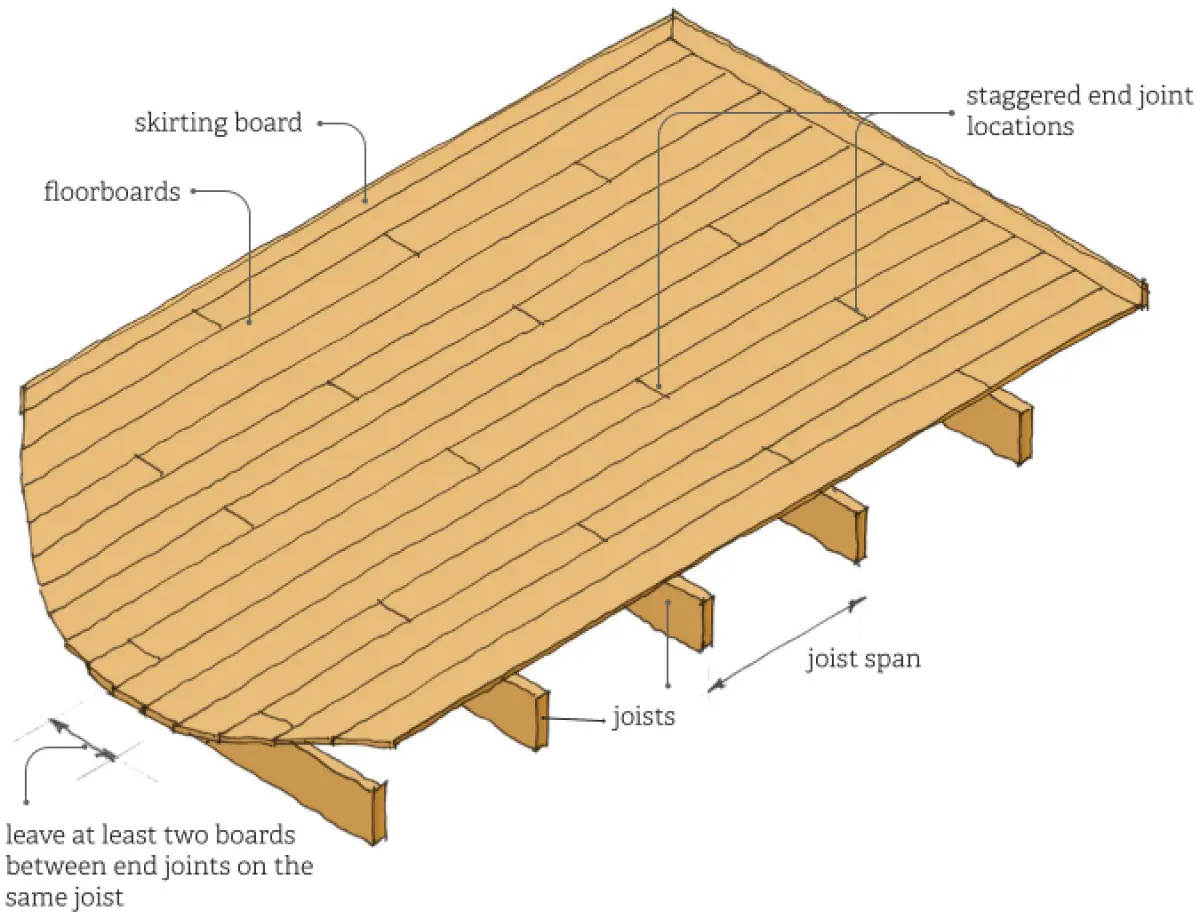
Replacing a section of flooring If more than one board needs to be replaced, cut out the damaged floorboards in a staggered pattern to give a more natural look to the repaired floor – see Figure 6.

- Remove boards as described in ‘Replacing a floorboard’ above. Where possible, make cuts over floor joists.
- Before installing the new floorboards, check the subfloor timber for damage or rot. If the subfloor timber is damaged or rotten, it must be replaced before installing new floorboards – see BRANZ Good Repair Guide Subfloor timber.
- Cut replacement boards to length, cutting end joints square or slightly angled so they fit tightly into the space of the boards that are being replaced. After cutting each board to length, fit and tap into place using a rubber mallet or a hammer.
- Face or secret nail each board into place as it is fitted. Before installing the final board, remove the bottom groove as described above.
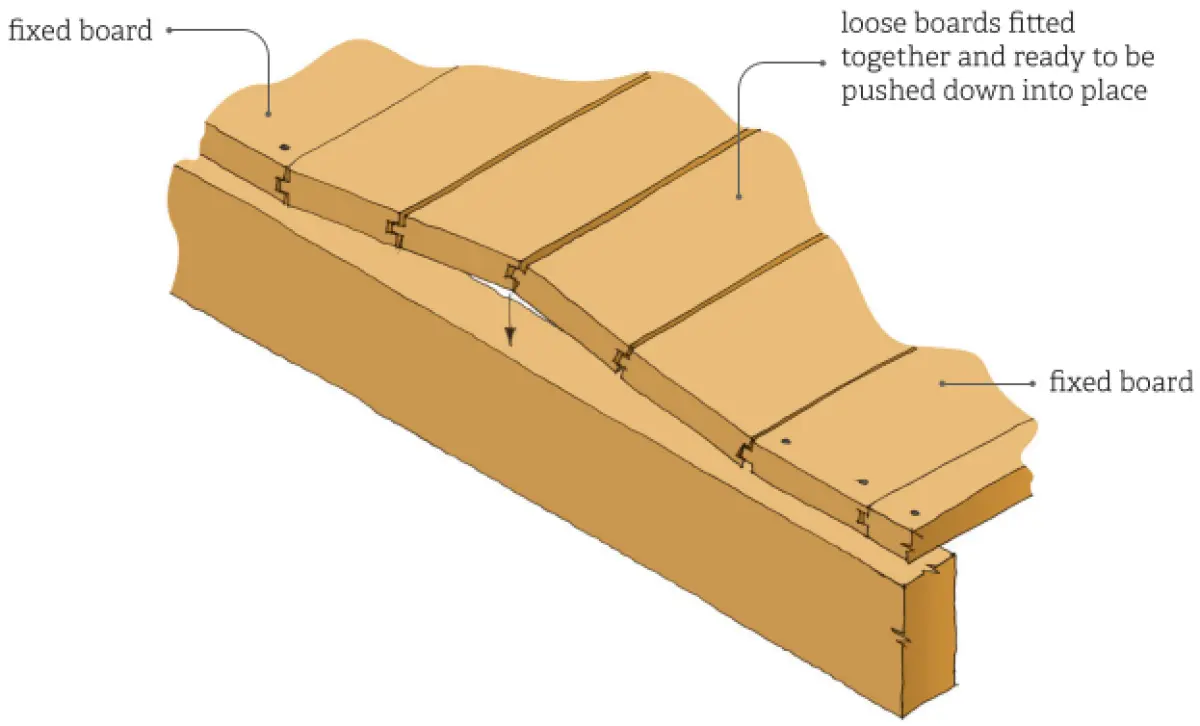
- Instead of removing the bottom groove of the final board to be fitted, the replacement boards can be ‘sprung’ or ‘folded in’. Fit the boards together joistsin a bowed formation with tongues and grooves fitted together (see Figure 7). Gently push the boards down and into position together, then face nail the boards to the joists.
Dealing with other timber flooring problems
Other flooring problems can range from squeaking and cupped floorboards to bouncy, springy or sagging and uneven floors.
Squeaking floorboards
Squeaking floorboards usually occur because of the timber drying and shrinking, causing gaps to open up between timbers – for example, between the floorboards and joists or between joists and bearers. The squeaking occurs when the gap between timbers is compressed by someone walking across the floor.
- The first step is to identify the cause of the squeaking floorboards. If the noise appears to be due to loose floorboards, they must be tightened against the joists.
- If there are gaps between the bearers and joists or the joists and the underside of floorboards, the gaps should be wedged or shimmed with small hardwood shims. Apply a timber adhesive to each wedge to permanently secure the wedge and to fill in any irregularities between timber surfaces. Avoid driving the wedge too far into the gap – this will widen the gap rather than fill it.
- If a gap is too small for wedges or shims or its exact location cannot be identified, fill any visible gaps between joists and floorboards with a bead of adhesive. Force as much adhesive into gaps as possible and apply to both sides of joists. Do not walk over the floor until the adhesive has fully cured.
- Squeaking can also sometimes be fixed by squirting powdered graphite or talcum powder between the boards that are rubbing together.
Cupped floorboards
Cupped floorboards are a result of different moisture levels on each face of the floorboards. Concave cupping occurs more commonly and is caused from high underfloor moisture levels.
The first step is to locate and address the source of the moisture. For information about dealing with high subfloor moisture levels, refer to BRANZ Good Repair Guide Damp subfloors.
If the floorboards can be dried out, they may return to the original shape. Boards that become loose as they dry out can be refixed by punching in nails and adding more nails as necessary.
Severely warped or buckled floorboards that cannot be straightened and worked back into position will need to be replaced – see ‘Replacing a section of flooring’ above.
Bouncy, springy or sagging floors
A bouncy, springy or sagging floor may be due to the span between floor joists being too large for the current thickness of the floorboards, or it may be an indication of subfloor deterioration or foundation/pile settlement.
It may be possible to fix the problem by adding additional subfloor support such as by inserting blocking between joists or by installing extra joists. Generally, however, repairs are likely to be complex and professional advice should be obtained – see BRANZ Good Repair Guide Subfloor timber.
Uneven floors
An uneven floor is also generally an indication of subfloor deterioration or foundation/ pile settlement. It may be due to inadequate subfloor design causing settlement of the foundations or damp problems causing subfloor timbers to rot. In either situation, repairs are also likely to be complex and professional advice should be obtained.
Sourcing replacement floorboards
When floorboards need to be replaced, demolition yards are a good source of secondhand floorboards. Select replacement boards to match the size, thickness, colour and grain of the original. It may be useful to remove a damaged section of floorboard to take along to the demolition yard when finding replacement boards.