


Work on a plaster-based cladding system is restricted building work (RBW), unless you are doing repairs or maintenance work under Schedule 1 of the Building Act 2004. All RBW requires building consent, and if you are doing the work, you either need to hold an external plastering licence or be supervised by someone who does.
Reduce risk of cracking
Cracking in external plastered claddings such as stucco and textured finishes is a potential source of water entry into the building structure. The cracking may be caused by:
- movement from changes in temperature, moisture level or curing shrinkage
- building movement due to wind or earthquakes.
Movement control joints, which allow movement to reduce the risk of cracking occurring, must be incorporated in plaster finishes. They manage cracking by providing predetermined lines of weakness or a flexible sealed joint in the plastered finish.
Locate joints during design
The locations of movement control joints should be determined at the design stage of the building project and should be based on the type of plastered or textured finish to be applied, as well as the overall look of the building.
Movement control joint locations must be shown on drawings and not left up to the on-site plasterer. There are a range of options for vertical joints. However, horizontal joints should be flashed or have a cladding overlap.
Movement control joints in textured finishes
Textured plaster finishes include modified cement and acrylic plaster and can be applied over a range of substrates. These include fibre-cement sheets, polystyrene, exterior insulation and finish system (EIFS) cladding and polystyrene block systems, clay bricks, concrete masonry and concrete.
Locating the joints in textured finishes
The locations of movement control joints in the plaster finish vary according to the substrate type. They should align with any movement control joints in the substrate and occur where the substrate support changes, for example, from solid to timber-framed construction. Locations for movement control joints are typically required:
- vertically in accordance with the supplier’s instructions, typically up to 5.4 m for fibre-cement and up to 20 m for EIFS
- aligned with structural control joints
- at each floor level for horizontal joints
- vertically on either side of large window and door openings
- at junctions between different materials.
Forming control joints in textured finishes
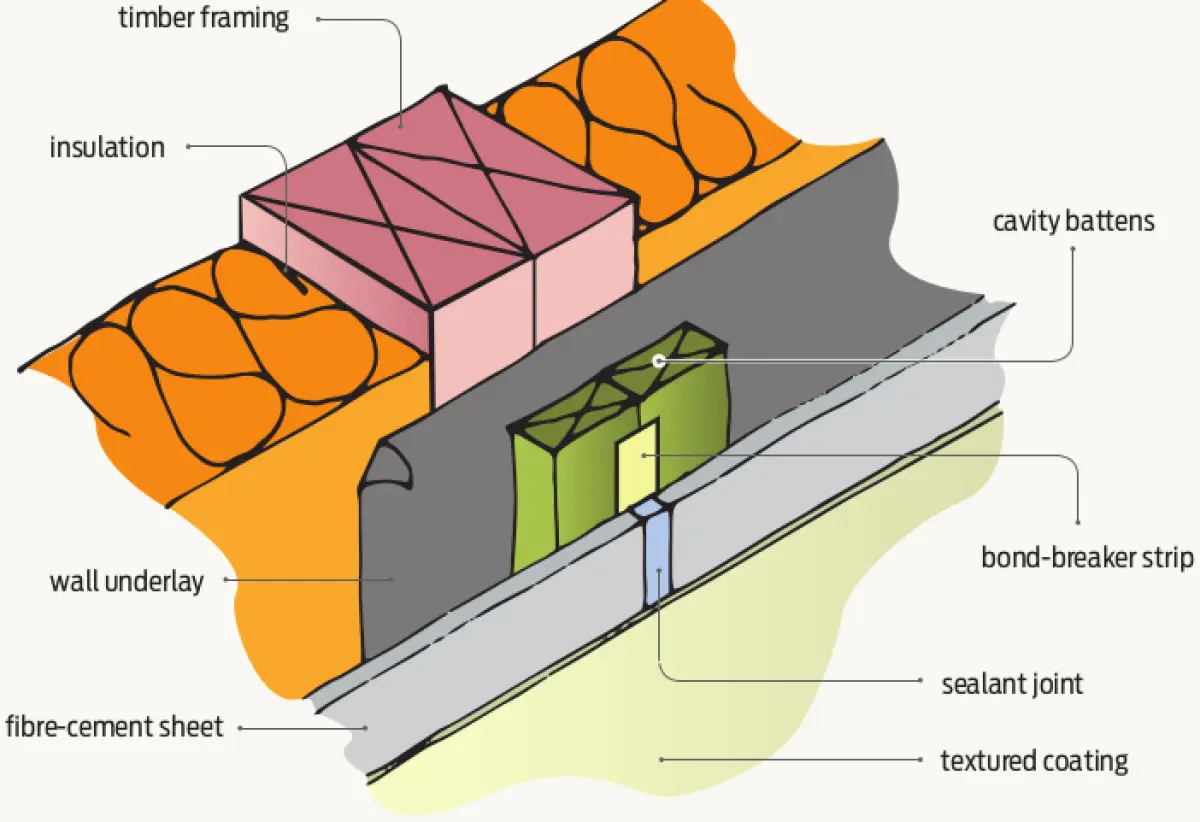
Vertical control joints can be formed in fibre-cement and polystyrene substrates by filling the gaps between the substrate sheets with sealant. This is over either a bond-breaker tape between fibre-cement sheets (see Figure 1) or a polyethylene foam (PEF) backing rod between polystyrene sheets (see Figure 2).
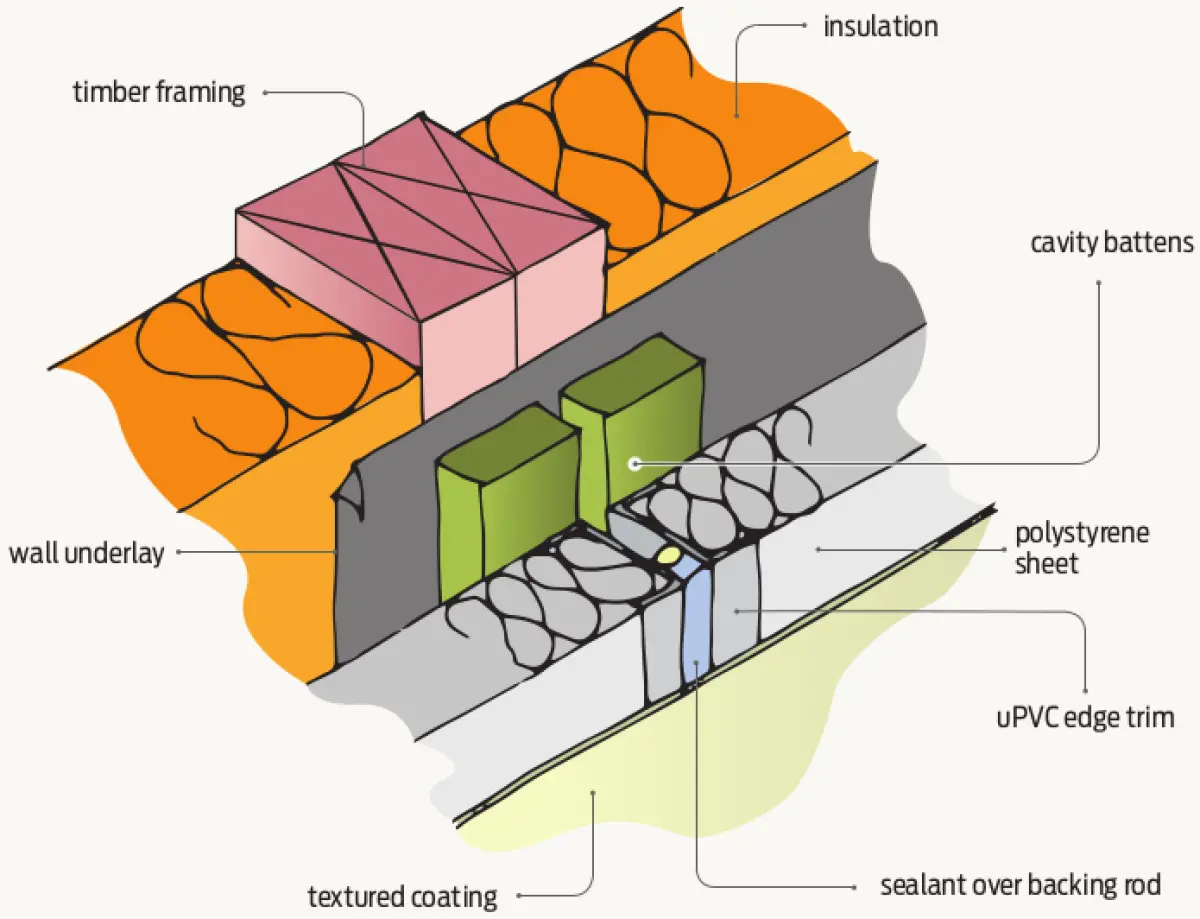
Alternatively, a proprietary unplasticised polyvinyl chloride (uPVC) expansion joint may be inserted between polystyrene sheets. The finish coat is then applied over the sealant or the expansion joint.
The sealant must be correctly installed to ensure that a waterproof joint is achieved. The sealant must:
- stick to both sides of the joint
- have a cross-section that is thinner in the middle of the joint than at the edges
- not adhere to the substrate material.
The joint ratio should be 2:1. For example, for a 10 mm wide joint, the sealant should be 5 mm deep at the centre of the joint.
Vertical control joints are typically between 6–18 mm wide depending on the substrate and the manufacturer’s recommendations.
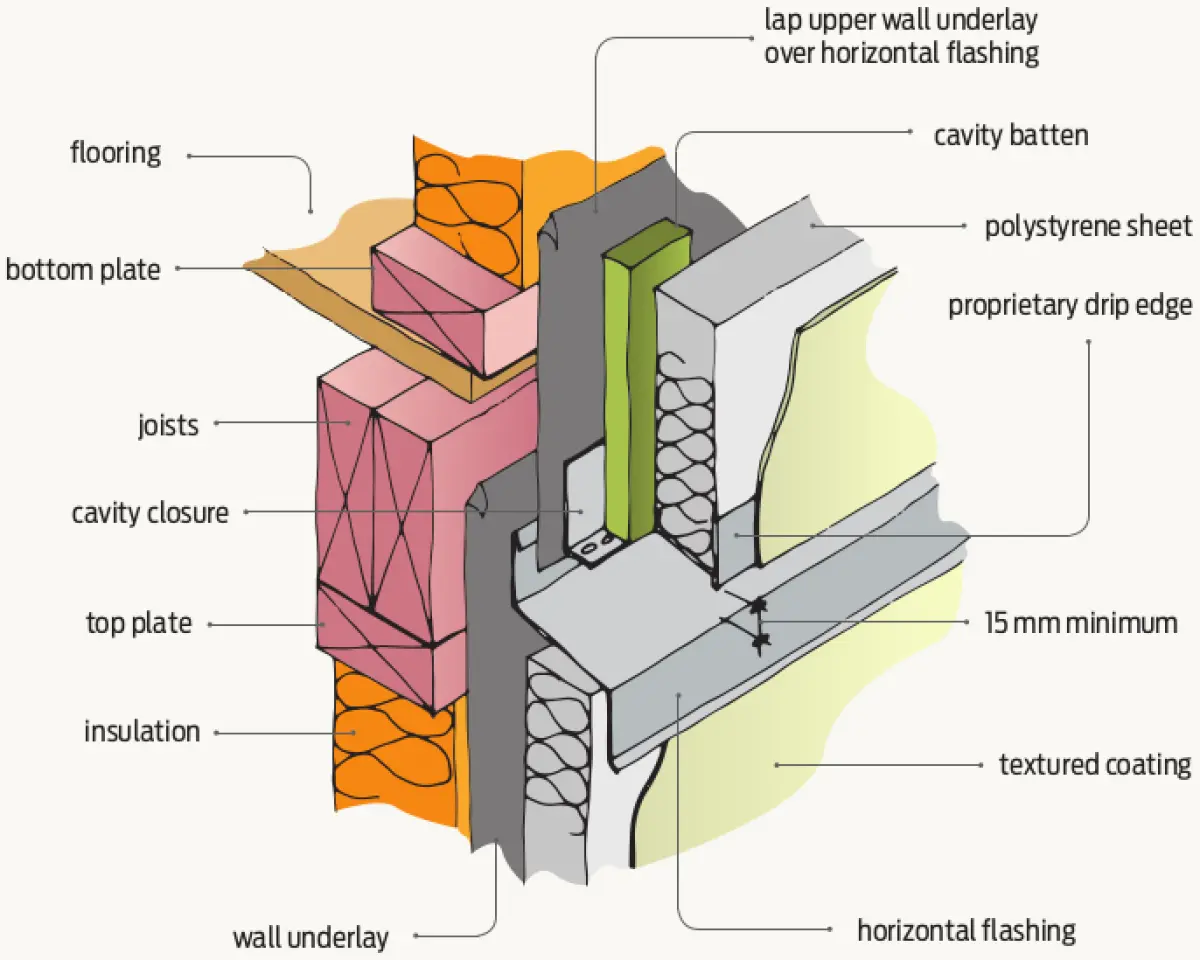
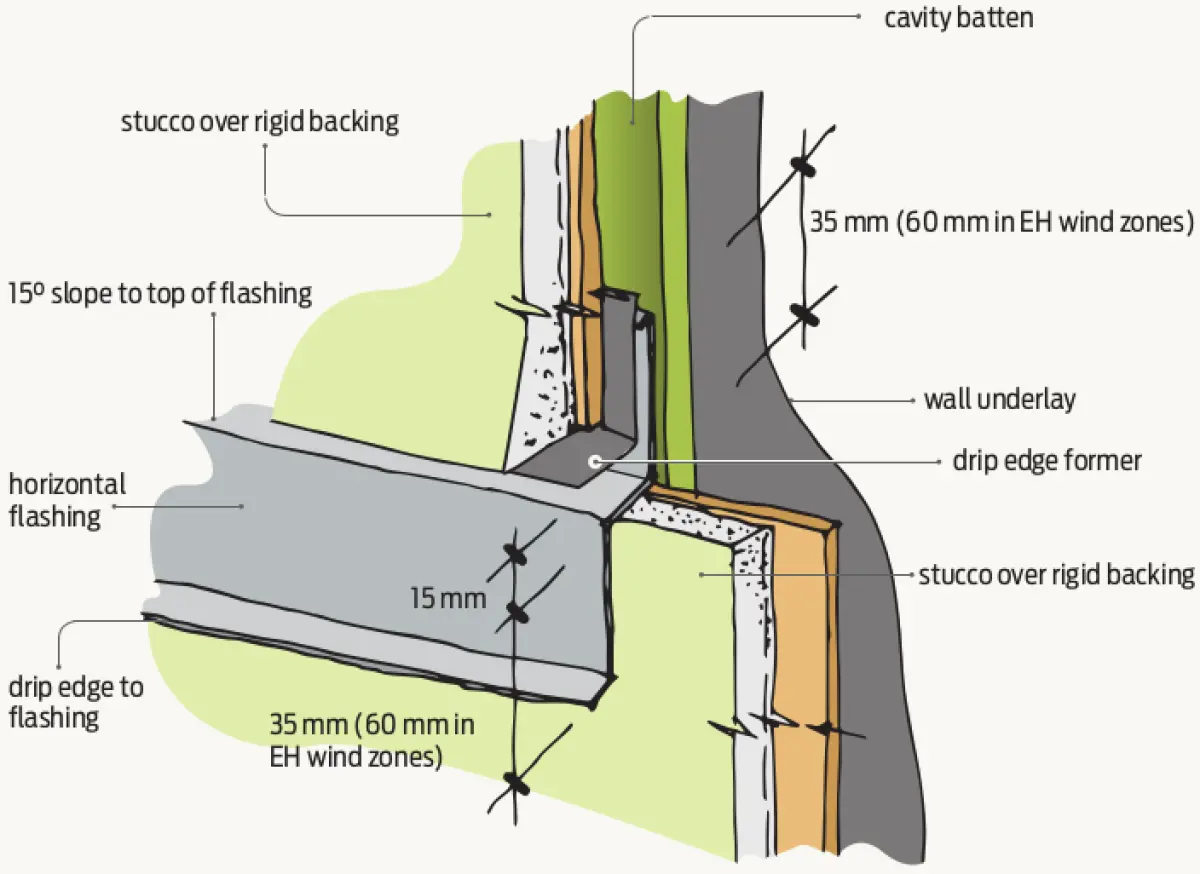
Inter-storey horizontal movement control joints are typically flashed with a metal flashing (see Figure 3) and should have a minimum 15 mm wide gap.
Movement control joints in stucco
Movement control joint requirements for reinforced stucco over a drained and vented cavity with a rigid or non-rigid backing are set out in NZS 4251.1:2007 Solid plastering – Cement plasters for walls, ceilings and soffits.
Locating the joints in stucco
NZS 4251.1:2007 requires control joints to be located:
- for vertical joints:
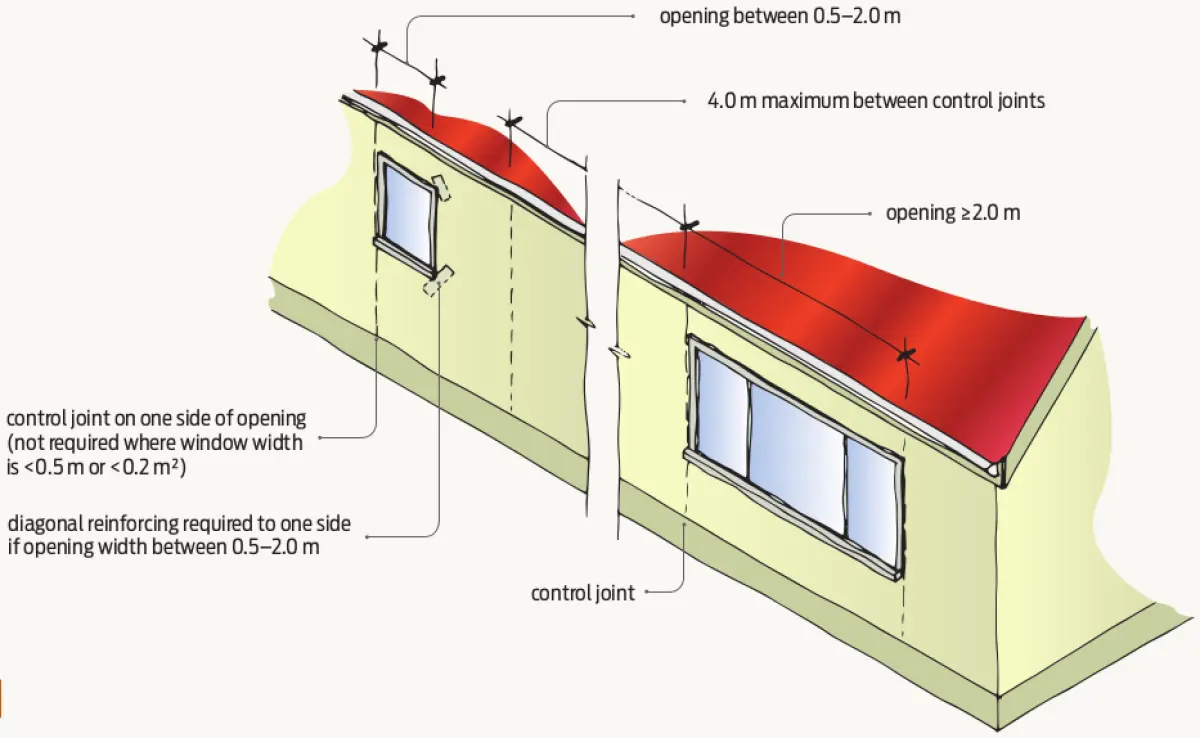
- on both sides of openings that are 2 m wide or more (see Figure 4)
- on one side of openings that are less than 2 m wide. (Note: A vertical control joint is not required when an opening is less than 500 mm wide or the area of the opening is less than 0.2 m². Where the width of an opening is between 500 mm and 2 m but the opening is more than 0.2 m², diagonal reinforcing is required at the corners opposite the movement control joint.)
- at each floor level (horizontal joints)
- to break up expanses of wall more than 12 m² (4 m maximum spacings vertically and horizontally is recommended)
- at changes in wall cross-section such as external and internal corners
- at any point where natural flexing of the building may occur, such as at the top of a plate level of a gable wall or where there is a cantilevered deck.
Forming joints in stucco
Vertical joints can be formed by plastering up to a corrosion-resistant angle, T-section, proprietary jointing bead or temporary batten (see Figure 5). Alternatively, for three-coat systems, a V-groove may be cut through the lower (bond and flanking) plaster coats before they harden.

Fill the gap or groove that is created with a polyurethane, polysulphide or neutral cure sealant inserted over a PEF backing rod before the plaster coat is applied. Prime the joint edges before applying sealant because sealant will not stick to the plaster.
The joints should be 10–12 mm wide, and wire mesh or lath reinforcing must not be carried across the control joints.
Horizontal movement control joints are typically flashed (see Figure 6) and should have a minimum 15 mm wide gap.
Quiz
1. Who should determine locations of movement control joints?
a. The building owner.
b. The plasterer on site.
c. The architect/designer.
d. The main contractor.
2. Vertical joints in stucco plaster are required on both sides of openings that are 2.0 m wide or more.
a. True.
b. False.
3. Vertical control joints in stucco may be formed by plastering up to an angle, T-section, proprietary jointing bead or temporary batten or by cutting a V-groove through the lower plaster coats before they harden, then filling with sealant.
a. True.
b. False.
4. Vertical control joints in fibre-cement and polystyrene substrates may be formed by plastering up to an angle, T-section, proprietary jointing bead or temporary batten or by cutting a V-groove through the lower plaster coats before they harden, then filling with sealant.
a. True.
b. False.
5. Joint sealant must adhere to the substrate or batten.
a. True.
b. False.
6. Joint sealant must adhere to both sides of the joint.
a. True.
b. False.
ANSWERS: 1. c 2. a 3. a 4. b 5. b 6. a