


How to achieve the starting point R6.6 construction R-value for roofs has resulted in many questions coming to the BRANZ Helpline. Here we try to resolve some of the key issues that have been raised.
BRANZ skillion roof design
The most common queries involve skillion roofs. Here, I consider a skillion roof detail we have been working on at BRANZ. Questions are usually concerned with how to design these roofs, but increasingly they also ask how to keep the construction price reasonable.
Note that there are currently no Acceptable Solutions available such as NZS 3604 Timber-framed buildings or E2/AS1 External moisture with details, materials or dimensions for timber skillion roof construction, so any proposal submitted for building consent approval will be considered as an Alternative Solution. Designers should prepare supporting evidence that their skillion roof design proposal will meet all its performance and durability requirements to the satisfaction of the building control officer processing the application.
Ensuring no gaps
The first skillion roof design principle that BRANZ addressed was to ensure there are no gaps that allow warm or moist air to travel up from the habitable rooms below into the roof structure above. The biggest culprit here is usually recessed light fittings that penetrate the ceiling lining.
While there are airtight-rated recessed light fittings available, instead we incorporated a continuous taped and sealed airtight sheet lining with no penetrations fixed directly to the underside of the rafters.
To achieve airtightness it could be a standard stopped plasterboard ceiling lining. But we used plywood sheet, which also provides additional bracing rigidity to the roof and ceiling plane. Note that this is a functional sealed surface that will not be seen so airtightness performance will be more critical than the finished appearance.
Standard timber ceiling battens
We also retained the use of standard timber ceiling battens – 35 mm thick at 600 mm span – fitted to the plywood surface and then fixed a standard plasterboard sheet ceiling, providing an aesthetically pleasing visible ceiling surface to the room below. This surface can be penetrated, creating a void in the ceiling plane for recessed LED lamps and wiring.
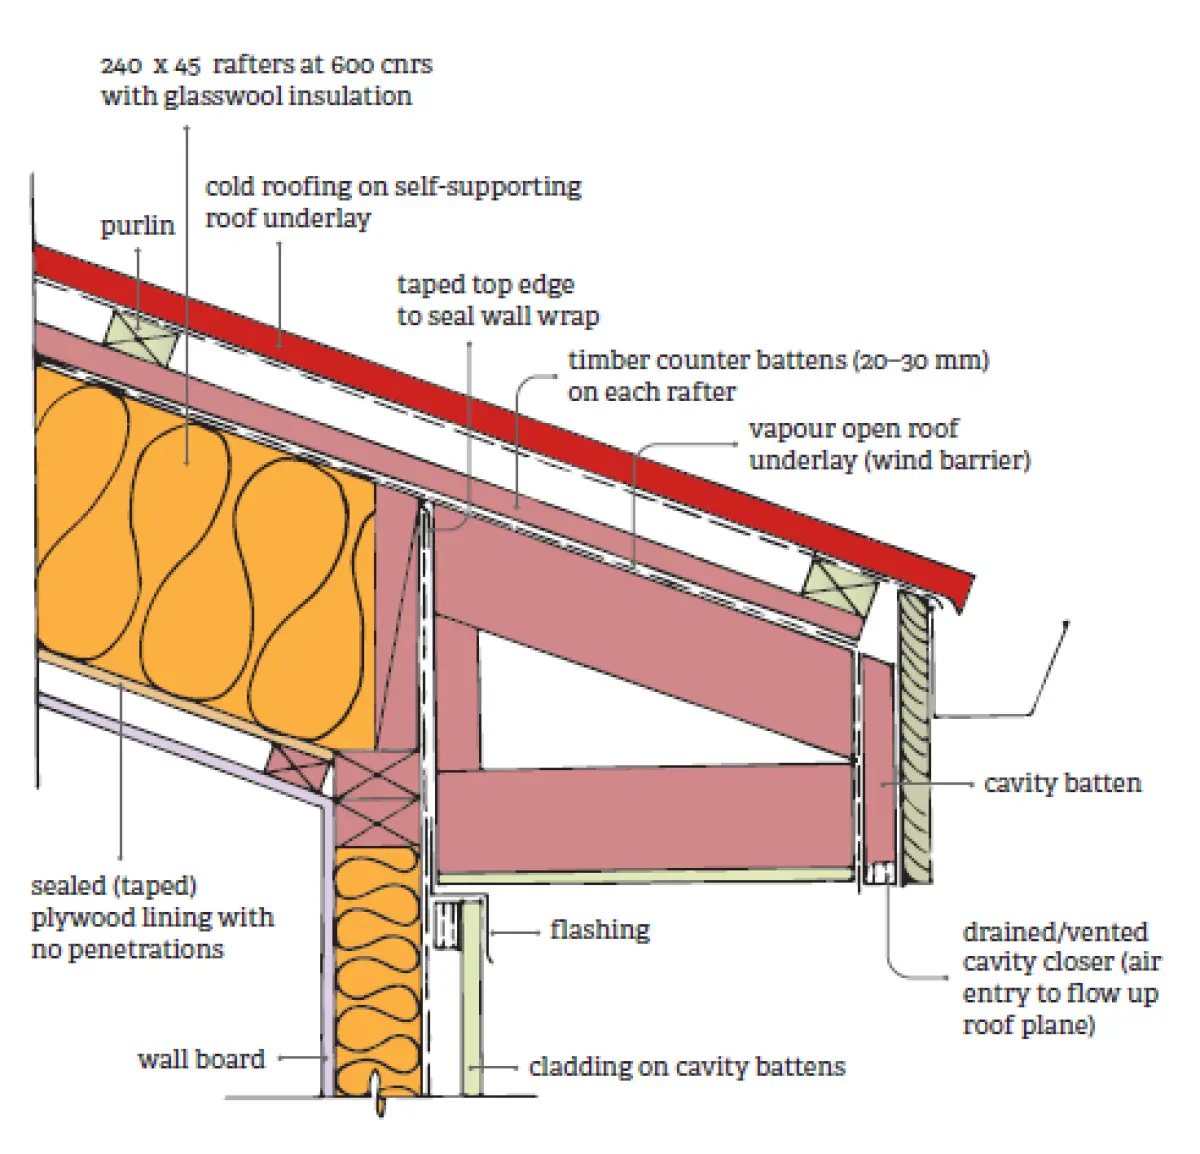
For this skillion detail, we used 240 x 45 mm rafters at 600 mm centres – a relatively common size and spacing for timber skillion roofs in Aotearoa – and utilised a generic glass wool insulation material fitted full depth to the 240 mm high void between the rafters.
Vapour open membrane
We fixed a layer of vapour open roof underlay to the top edge of the timber rafters, snugly encapsulating all our insulation material between each pair of adjacent rafter.
The vapour open membrane is necessary to enable any moist air that makes its way into the insulation material to pass through and escape safely into the ventilated space above.
There is typically a small pressure differential (approximately 4 Pa) between the interior space below and the ventilated plane within the skillion structure above. This will be enough to gradually drive the moist air up past the insulation material and through the vapour open membrane to the airflow paths, where it can be safely removed to the exterior of the building.
This membrane will primarily act as a wind barrier, preventing windwash occurring where the air moving through the roof cavity disturbs the insulation material and compromises the efficient optimum thermal insulation performance of the material.
It also provides additional protection should moisture or condensation occur in the roof void below the cold roofing material. If droplets do fall on the top of the vapour open membrane, they will run down the slope of the roof and exit to the exterior via the drained and vented cavity behind the eaves and fascia board (see Figure 1).
Airflow pathways
The next layer in the roof plane is the most important. This is where pathways are created for air to flow passively up through the roof plane from:
- the inlets at the eaves or fascia up through the airflow paths in the skillion roofto outlets at the highest edge of the roof – a ridge with outlet vents
- a monopitch roof upper eave, or
- a junction where it forms a lean-to roof against an adjacent vertical wall or parapet.
Both the inlet and outlet vents must be carefully detailed to allow free flow of air while remaining fully weathertight. We used the rule of thumb that the total cross-sectional area of inlet vents should be approximately twice the total area of the exit vents at the top to maintain steady passive free airflow up the roof but avoid noisy rushing currents of air racing up through the confined spaces of the roof.
To maintain the airflow paths up the roof, we show a simple solution using a timber counter batten. On the top edge face of each rafter, we have fixed a continuous 45 mm wide x 20 mm deep timber batten to the full length of the rafter.
This lifts all the horizontal purlins clear of the vapour open roof underlay and maintains clear unimpeded air channels between each pair of counter battens up the full height of the roof plane. Note that the purlins will now sit 20 mm higher above the top face of the rafters so the purlin fixings will have to be increased in length accordingly.
There are other methods of creating the airflow through this plane of the roof, including proprietary kit such as castellated purlins and battens – timber or synthetic material – so search for what is available. Some options may be more suitable for the specific requirements of your skillion roof design.
Detailing and further research
Above the counter battens, we revert to standard traditional roof design – cold roofing such as long-run profiled galvanised steel on self-supporting roof underlay with the underlay draped beyond the fascia into the spouting.
Another detail worth mentioning is sealing the ends of the spaces between rafter pairs. Our drawing shows continuous bevelled blocking between the rafters but with the additional protection of continuing the wall wrap up past the wall to the top of the blocking where it is sealed with a continuous length of tape to keep it airtight.
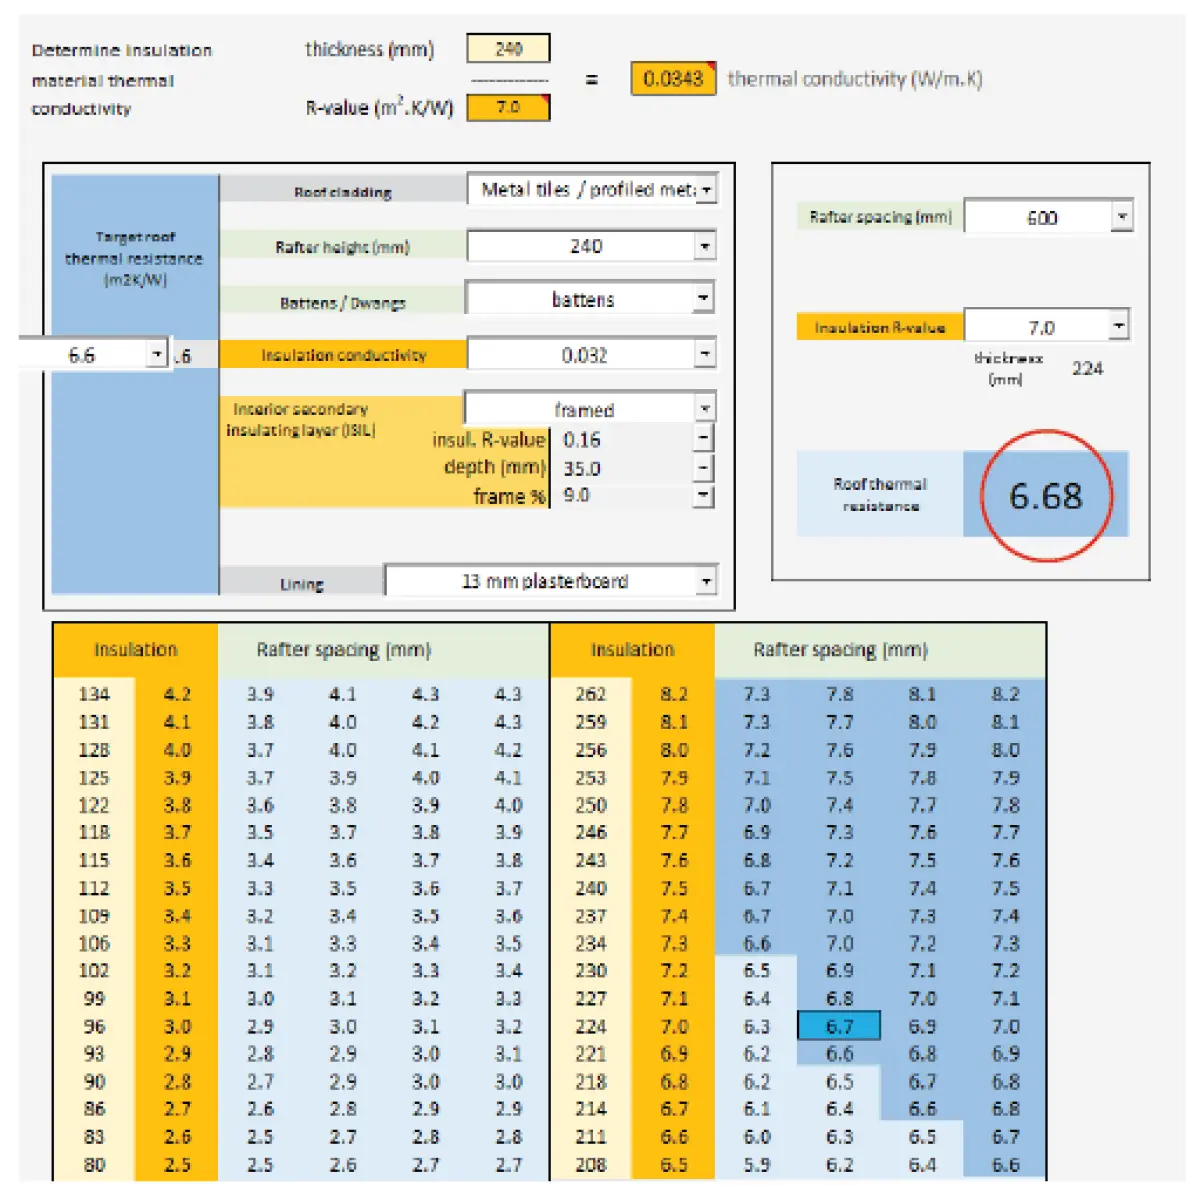
In a future issue of Build, we will look at the construction junction options at the top edge of the skillion roof. A further point of interest is that we used the BRANZ House insulation guide to establish the construction R-value of this detail. The construction R-value is R6.68 (see Figure 2).